


Special offers from our partners!

Find Replacement BBQ Parts for 20,308 Models. Repair your BBQ today.
Page 48
Heatilator • Constitution EPA Fireplace • 480-1091H
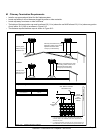
4/12
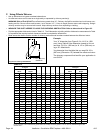
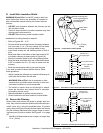
The following steps should be skipped if using a
chase.
• Install roof ashing appropriate to roof pitch.
• Install round termination cap and storm collar.
• Nail the ashing to the roof. Keep gaps between the
ashing plate and the roof to a minimum.
• Caulk the ashing plate and roof junction as well as the
vertical seam on the ashing. All nail heads must be
caulked with a roong sealant.
• Caulk the overlap seam of any exposed pipe sections
that are located above the roof line to prevent leaks.
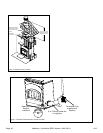
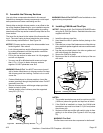
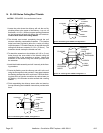
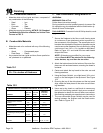
Figure 8.12 Ceiling/Attic Construction
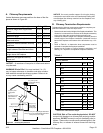
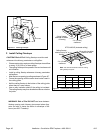
• Refer to Figure 8.11.
• Plumb from roof to center of chimney.
• Drive a nail up through roof to mark center of pipe.
• Measure to either side of nail and mark the 14-1/2 in. x
14-1/2 in. (368 mm x 368 mm) opening required.
• Measure opening on the horizontal; actual length may
be larger depending on roof pitch.
• Cut out and frame opening.
• Refer to Chapter 25 of the Uniform Building Code for
roof framing details.
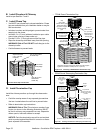
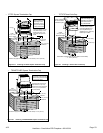
Continue assembling the chimney sections up through the
ceiling restops as needed. While doing so, be aware of the
height and unsupported chimney length limitations given un-
der Section 8.A. Chimney Requirements.
Check each section by pulling up slightly from the top to en-
sure proper engagement before installing the succeeding
sections. If they have been connected correctly, they will not
disengage when tested.
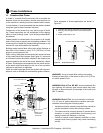
I. Double-check the Chimney Assembly
J. Cut out Hole in Roof
K. Complete Installation
L. Install Flashing
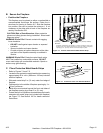
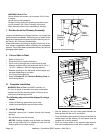
Ceiling
Firestop
Straps
Optional
Additional
Support
Joint
Band
(Optional)
Figure 8.11 Secure the Chimney
• Assemble chimney so it passes through the framed
opening.
• Slip the ashing over the chimney.