


Special offers from our partners!

Find Replacement BBQ Parts for 20,308 Models. Repair your BBQ today.
4/12
Heatilator • Constitution EPA Fireplace • 480-1091H
Page 47
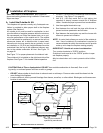
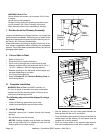
Installation of a ceiling restop is required
• Refer to Figures 8.8 - 8.10.
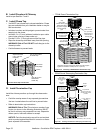
• Roll the shield (around the chimney if already installed)
until you have a 3 in. (76 mm) overlap and the three
holes on each side match up (large holes on top).
• Insert three screws into the matching holes to form a
tube.
• Bend three tabs on the bottom of the tube inward to 90°
to maintain chimney air space (refer to Figure 8.8).
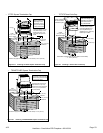
• Rest the insulation shield on the ceiling restop below.
• Bend the three short tabs at the top of the shield inward
to 90° to maintain the 2 in. (51 mm) air space from the
chimney.
• Bend the remaining top tabs to just meet the pipe.
If you wish to make a custom shield or barrier, follow
these guidelines:
• Metal is preferred, although any material stiff enough to
hold back the insulation can be used.
• The shield or barrier must be tall enough to extend
above the insulation and prevent blown-in insulation
from spilling into the cavity.
• Maintain specied air spaces around chimney.
• Check instructions and local codes for further details.
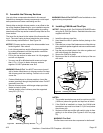
3 in. (76 mm)
overlap
Insert three
screws
Bend inward
90°
Bend remaining tabs
to rest against pipe to
prevent insulation
from falling in.
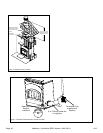
Figure 8.8 Prepare Attic Insulation Shield
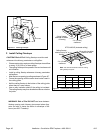
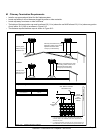
6 Tabs bent
in 90°
Tabs bent in to
rest against pipe
Attic Insulation Shield
Ceiling Firestop
10-1/2 in.
(267 mm)
14-1/2 in. (368 mm)
diameter
InsulationInsulation
Pipe
Pipe
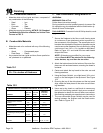
6 Tabs bent
in 90°
Tabs bent in to
rest against pipe
Attic Insulation Shield
Ceiling Firestop
10-1/2 in.
(267 mm)
14-1/2 in. (368 mm)
diameter
InsulationInsulation
Pipe
Pipe
Figure 8.9 Install Attic Insulation Shield (restop above ceiling)
Figure 8.10 Install Attic Insulation Shield (restop below ceiling)
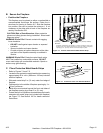
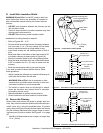
G. Install Attic Insulation Shield
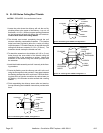
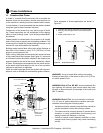
When offsets and returns are joined to straight pipe sec-
tions, they must be locked into position with the screws pro-
vided* (outer only), using the predrilled holes. To prevent
gravity from pulling the chimney sections apart, the returns
and the chimney stabilizers have hanger straps for secur-
ing these parts to joists or rafters. See Figure 8.11 on page
48.
* Use #6 or #8 sheet metal screw, or larger, no longer than
1/2 in. (13mm).
H. Secure the Chimney