


Special offers from our partners!

Find Replacement BBQ Parts for 20,308 Models. Repair your BBQ today.

4-03 23 480-1081
North Star
EPA Certied Fireplace
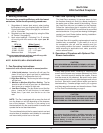
For maximum operating efciency with the lowest
emissions, follow these operating procedures:
1. Regardless of desired heat output, when loading
the replace, burn your replace with the Slide Air
Control wide open (fully to the right) for a minimum
of 5 to 15 minutes.
2. Regulate burn rate (heat output) by using the Slide
Air Control. See page 22.
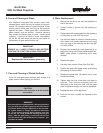
3. Heat output settings: Following 5 to 15 minutes
of burning with the control wide open (see #1
above):
BTU / Hr
Below 10,000
10,000 - 15,000
15,000 - 30,000
Maximum Heat
*Slide Control
Slide LEFT to Stop
Stop to 1/8” -1/2” open
1/2” - 1-1/2” open
Fully open
*These are approximate settings, and will vary with
type of wood or chimney draft.
NOTE: BURN DRY, WELL-SEASONED WOOD.
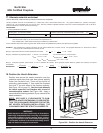
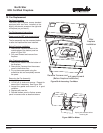
7. Fan Operating Instructions
Instructions with override switch in manual position.
8. Heat Zone Operating Instructions
1. Initial (cold) startup: Leave fan off until your re-
place is hot and a good coal bed is established,
approximately 30 minutes after fuel is lit.
2. High Burn Setting: The fan may be left on through-
out the burn.
3. Medium or Medium High Burn Setting: The fan
should be left off until a good burn is established,
then turned on a medium or high rate.
4. Low Burn Setting: The fan tends to cool the re-
place. Leave fan off until the burn is well estab-
lished; then, if you wish, turn the fan on at a low
rate.
NOTE: The Fan is equipped with a snap disc that will
turn the blower on and off depending on the tempera-
ture of the replace. If the fan is not coming on at
the desired time, ip the override switch to manual and
operate the fan as described above.
The override switch and the fan speed control are hard
wired at time of installation and installed in a standard
wall mount with junction box on the wall.
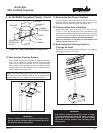
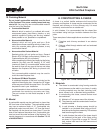
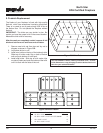
6. Burning Guidelines
The Heat-Zone accessory kit conveys warm air from
the replace through air duct(s) to remote locations in
the same room or other rooms of the building. One or
two Heat-Zone kits can be installed on the replace.
Follow the instructions that is supplied with the kit.
Installation of this kit MUST be performed by a qualied
service technician. If any parts are missing or damaged,
contact your local Dealer before starting installation.
DO NOT install a damaged kit.
The Heat-Zone kit is carefully engineered and must be
installed only as specied. If you modify it or any of
its components, you will void the warranty and you
may possibly cause a re hazard. Installation must be
done according to applicable local, state, provincial,
and/or national codes.
CAUTION:
ALL wiring should be done by a qualied electrician and
shall be in compliance with local codes and with the
National Electric Code ANSI/NF No. 70-current (in the
United States), or with the current CSC22.1 Canadian
Electric Code (inCanada).
CAUTION:
NEVER LEAVE THE FIRE UNATTENDED WHILE USING THE
FIRESCREEN. NEVER LEAVE CHILDREN UNATTENDED
WHEN THERE IS A FIRE BURNING IN THE FIREPLACE.
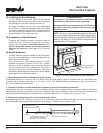
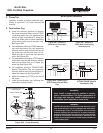
9. Operation of Fireplace with Optional Fire
Screen Instructions
Alway wear gloves when installing or removing the
screen as the screen may become extremely hot while
in use. Use both hands to stablize the screen. Ensure
that the screen is fully attached. Be careful not to stack
wood close to the front or too high that logs could roll out
the front. Start with a small re and adjust your heat to
desired setting. If smoke spillage occurs, put on gloves
and then remove the screen and close the doors. Refer
to Flue Draft Troubleshooting on page 4.
CAUTION:
THE FIRESCREEN MAY BECOME EXTREMELY HOT WHILE
IN USE. ALWAYS WEAR GLOVES TO PREVENT INJURY.