


Special offers from our partners!

Find Replacement BBQ Parts for 20,308 Models. Repair your BBQ today.

Setup
Read, understand, and follow all warnings before starting
or operating this sprayer.
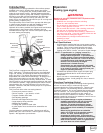
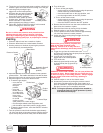
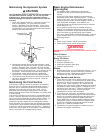
1. Connect the siphon hose to the fluid section and the bleed
hose to the bleed valve. They each have factory installed37)(
tape on the male end of the hoses and should be
tightened wrench tight.
2. Attach a minimum of 50’ of nylon airless spray hose to the
unit. Do not use 37)( tape or thread sealant on the
spray hose connection.
3. Attach an airless spray gun to the spray hose. Do not
attach the tip to the spray gun yet. Remove the tip if it is
already attached.
a. To use two guns, remove the plug from the second gun
outlet on the filter assembly. Connect a hose and gun
to the outlet.
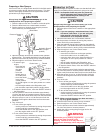
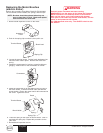
4. Fill the wet-cup 1/2 full with Speeflo
Piston Lube (P/N 700-925) supplied
by the factory. This extends packing
life.
5. Check the hydraulic fluid level daily before starting the
unit. The hydraulic fluid level should be at the “Full” mark
on the dipstick. Refer to the Maintenance section of this
manual for hydraulic system maintenance instructions.
Use of Speeflo's Coolflo™ Hydraulic Fluid is mandatory in
the hydraulic system. Do not use any other hydraulic
fluid. Use of any other hydraulic fluid may seriously
damage the hydraulic system and will void the warranty.
CAUTION
NOTE: The gas unit is
engineered to handle up
to 4 guns with .019" tips
and the electric unit is
engineered to handle up
to 3 guns with .019” tips.
For multiple gun
operation, connect a
multiple gun manifold to
the single gun outlet.
Connect a hose and gun
to each outlet. Make
sure the second gun
outlet remains plugged.
Multiple Gun
Manifold
Bleed
Hose
Siphon Hose
Bleed Valve
Fluid Section
WARNING
6©Titan Tool Inc. All rights reserved.
6. For gas models, check the engine oil level daily before
starting the unit. The gasoline engine oil level is
determined by the engine manufacturer. Refer to the
engine manufacturer’s service manual supplied with this
unit.
7. For electric models, use a 20 amp service outlet. Always
locate the electric model within 10 to 15 feet of the service
outlet. Use a short electric cable and a long paint hose.
Any extension cord will create some voltage drop. If an
extension cord is necessary, use only a grounded 3-wire
#12 extension cord.
8. Make sure the unit is grounded. All units are equipped
with a grounding lug. A grounding cable (not supplied)
should be used to connect the unit to a true earth ground.
Check your local electrical regulations for detailed
grounding instructions. See the Accessories and Service
Kits section near the back of this manual for grounding
cable ordering information.
Proper grounding is important. This applies to both gas
and electric powered models. The passage of some
materials through the nylon fluid hose will build up a
static electric charge, which if discharged, could ignite
solvent vapors present and create an explosion.
9. Strain all paints with a nylon strainer to ensure trouble free
operation and freedom from frequent cleaning of the inlet
screen and gun filter.
10 Make sure the spray area is well ventilated to prevent
hazardous operation with volatile solvents or exhaust
fumes.
If lacquer or other flammable materials are to be sprayed,
ALWAYS locate the unit outside the immediate spraying
area. Failure to do so may cause an explosion.
11. Locate the unit outside the immediate spraying area to
avoid clogged air intake of the engine or electric motor
with overspray.
WARNING
WARNING
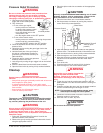
NOTE: If the unit is being operated in an area that is
overloaded by other appliances or low voltage
conditions, it is important to start the unit
"unloaded." Tip the electric motor forward so
that the belt is loosened and the motor starts
without full load. This reduces the amperage
draw on starting and may avoid tripping the
circuit breaker.
English