


Special offers from our partners!

Find Replacement BBQ Parts for 20,308 Models. Repair your BBQ today.

38
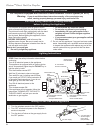
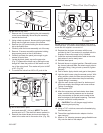
Chateau™ Direct Vent Gas Fireplace
20011957
Fuel Conversion Instructions
WARNING! This conversion kit shall be installed
by a qualified service agency in accordance with
the manufacturer’s instructions and all applicable
codes and requirements of the authority having ju-
risdiction. If the information in these instructions is
not followed exactly, a fire, explosion or production
of carbon monoxide may result causing property
damage, personal injury or loss of life. The qualified
service agency is responsible for the proper instal-
lation of this kit. The installation is not proper and
complete until the operation of the converted appli-
ance is checked as specified in the manufacturer’s
instructions supplied with the kit.
CAUTION: The gas supply shall be shut off prior to
disconnecting the electrical power, before proceed-
ing with the conversion.
Avertissement: Cette trousse de conversion Ne doit
être installée que par le représentant d’un organ-
isme qualifié et conformément aux instructions du
fabricant et aux codes et exigences pertinentes de
l’autorité compétente. Quiconque ne respecte pas
à la lettre les instrucitons du présent guide risque
de déclencher un incendie, une explosion ou le dé-
gagement de monoxyde de carbone entraînant des
dommages matériels, des lésions corporelles ou la
perte de vies humaines. L’organisme qualifié qui
effectur les travaux est responsible de l’installation
de cette trousse. L’installation n’est pas terminée
tant que le fonctionnement de l’appareil converti
n’a pas été vérifié selon la notice du fabricant qui
accompagne la trousse.
ATTENTION: Avant d’effectuer la conversin, coupez
d’abord l’limentation en gaz, ensuite, coupez
l’alimentation électrique.
Conversion Precautions
Allow unit to cool if it has been operating.
Before proceeding with conversion, turn control knob on
valve to OFF and turn gas supply OFF. Turn OFF any
electricity that may be going to appliance.
Conversion Procedure
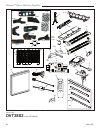
1. Remove glass frame. Refer to Page 27.
2. Remove lava rock, volcanic rock, embers and logs.
Carefully remove brick panels.
CAUTION: Logs may be hot.
Replace Burner Orifice
1. With a Phillips or Robertson screwdriver, remove
the four (4) nuts holding the fettle to the burner as-
semblies. With a hex, remove the two (2) hex nuts
holding each burner tube to the front of the burner
assembly on both sides. Remove burner tubes.
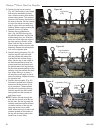
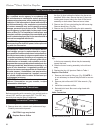
2. Remove two (2) hex nuts holding the left burner leg.
Remove burner leg. (Fig. 54)
3. Remove two (2) screws holding the pilot assembly
KT550
Fig. 54 Use 3/8” socket to remove hex nuts holding burner
legs.
Hex
Nuts
to the burner assembly. Move the pilot assembly
toward the back.
4. Slide the burner housing assembly to the left and
away.
5. Replace the four (4) injectors. Refer to Table 1.
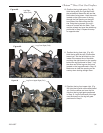
Replace Pilot Orifice
1. Remove pilot hood by lifting up. (Fig. 55) NOTE: It
is not necessary to remove the pilot tube for conver-
sion.
2. Remove pilot orifice with 5/32” Allen wrench. (Fig.
56)
3. Install the conversion orifice.
4. Reinstall pilot hood. Be sure to align hood with
index tab.
Valve Conversion
CO133
pilot hood
3/07
Pilot
Bracket
Pilot Hood
CO133
Fig. 55 Remove pilot hood.