


Special offers from our partners!

Find Replacement BBQ Parts for 20,308 Models. Repair your BBQ today.

20
Chateau™ Direct Vent Gas Fireplace
20011957
FP1458
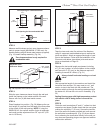
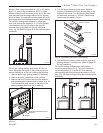
Fig. 22 Through the wall.
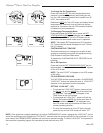
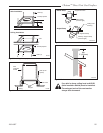
FP1457
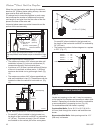
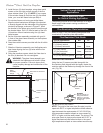
Fig. 21 Horizontal length requirement.
X
FP1460
Fig. 23 Secure termination to wall.
Support horizontal pipes every 3’ (914 mm)
with metal pipe straps.
Check fireplace to make sure it is levelled
and properly positioned.
Sidewall Installation with
Stationary Glass Facing Outside
CAUTION: Unit must be installed with station-
ary glass facing outside. (Control housing will be
located on the left side of the unit when facing the
unit from inside the house.)
Failure to do so will result in a major reconstruction
and CFM Corporation will not be responsible for
costs associated with incorrect installation..
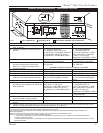
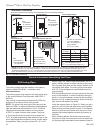
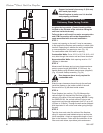
STEP 1
Locate vent opening on the wall. It may be necessary
to first position the fireplace and measure to obtain hole
location. Depending on whether the wall is combustible
or noncombustible, cut opening to size. (Fig. 18)
For combustible walls first frame in opening.
Combustible Walls: Cut a 16
¹⁄₄”H x 16¹⁄₄” W (413 x 413
mm) hole through the exterior wall and frame as shown.
Noncombustible Walls: Hole opening must be 11
¹⁄₄”
(286mm) in diameter.
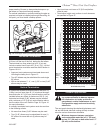
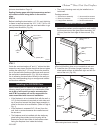
STEP 2
Measure wall thickness and cut zero clearance sleeve
parts to proper length (MAXIMUM 12”/305 mm). As-
semble sleeve using #8 sheet metal screws (supplied).
(Fig. 19) Install firestop assembly. (Fig. 34)
Zero clearance sleeve is only required for
combustible walls.
STEP 3
Slide the zero clearance sleeve through the wall and
install the firestop on the inside surface of the wall.
Secure with four (4) #8 sheet metal screws.
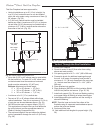
STEP 4
Place fireplace into position. (Fig. 20) Measure the
vertical height (X) required from the base of the flue
collars to the center of the wall opening. NOTE: If using
the SK8DVSK Kit, the vertical section of pipe is tele-
scopic and could provide adjustment from 24” up to 40”
(610mm to 1016mm). Through the wall section shipped
with the starter kit will not be used when going through
the wall.
STEP 5
Tape the inner and outer flue collars of the fireplace
using UL approved metal adhesive tape to ensure the
joints are sealed. Attach an appropriate length of vent
pipe to the fireplace. Follow with the installation of the
inner and outer elbow, tape elbow joints and secure