


Special offers from our partners!

Find Replacement BBQ Parts for 20,308 Models. Repair your BBQ today.
GAS BRAISING PANS - SERVICE PROCEDURES AND ADJUSTMENTS
F25121 (February 2003)
Page 21 of 32
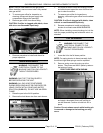
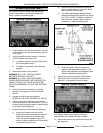
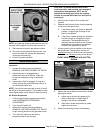
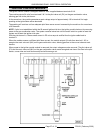
FRONT VIEW OF BURNER AIR SHUTTER
SHOWN
NOTE: Accurate gas pressure adjustments can only
be made with the gas on and the main burners lit.
9. Set pressure as listed in gas pressure table.
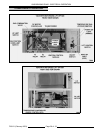
10. Once the correct pressure has been set, turn
the on/off switch off, replace the adjustment
screw cap and pipe plug.
11. Check for proper operation.
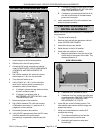
MAIN BURNERS
Inspection
1. Access the main burners as outlined in
REMOVAL AND REPLACEMENT OF PARTS.
2. Inspect burners for clogged ports or
obstructions around air shutter. Clean the
burner (as necessary) using a soft bristle
brush.
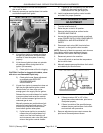
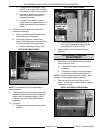
3. Inspect gas orifice for clogging. If clogs are
found, remove the orifice and clean with air or
non-flammable liquid only.
NOTE: If the orifice was removed, be sure to install
the orifice in the same location. The outside burners
use a slightly larger orifice than the center burner(s).
Air Shutter Adjustment
1. Verify the gas manifold pressure as outlined
under GAS MANIFOLD PRESSURE
ADJUSTMENT.
2. Turn the on/off switch off.
3. Remove the control panel as outlined in
REMOVAL AND REPLACEMENT OF PARTS
to gain viewing access to the right side burner.
4. Turn the on/off switch on and set the
temperature dial to call for heat.
CAUTION: To prevent discoloration of the
cooking surface, and possible pan warpage at
temperature settings above 250°F, do not
operate the braising pan unless the cooking
surface is covered with water or a thin layer of
cooking oil.
5. Allow burners to remain lit for at least five
minutes.
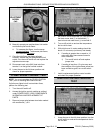
6. Observe each burners< flame thru the opening
in the front of the burner box.
A. If the flame is blue, air shutter is adjusted
properly. A slight tinge of orange in the
flame is acceptable.
B. If the flame is yellow tipping, this indicates
too little primary air (oxygen) for proper
combustion. The heating efficiency is
reduced, and the amount of soot (carbon)
generated as a by-product is increased.
Continue with procedure to adjust.
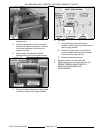
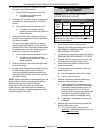
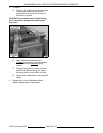
7. Loosen screw on the air shutter for the burner
being adjusted. Closing the air shutter will
decrease
primary air to the burner and opening
the shutter will increase
primary air the burner.
8. Monitor the burner flame and set the air shutter
opening as follows:
A. Adjust the air shutter (as necessary) to
obtain a blue flame. A slight tinge of
orange in the flame is acceptable.
B. After the air shutter adjustment is made,
tighten the set screw.
9. Adjust the remaining burners as necessary.