


Special offers from our partners!

Find Replacement BBQ Parts for 20,308 Models. Repair your BBQ today.

19
W415-0583 / B / 05.23.07
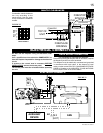
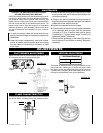
Your comes equipped with our Night Light
TM
. The
light has been pre-wired and is controlled from the remote
control.
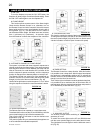
If in the event the lamp or lens needs to be replaced, follow
the instructions below.
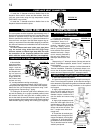
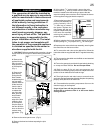
Unplug the wire harness
/ transformer from the
junction box inside the
fi replace or turn off the
electrical breaker for the
fi replace.
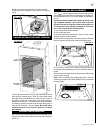
NIGHT LIGHT
TM
REPLACEMENT
SCREWS
LENSE
FRAME
FIREBOX TOP
FIGURE 44
Remove the four screws that secure the lens frame to the
top of the fi rebox.
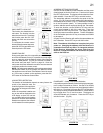
This frame retains the glass lens. The lamp can now be
accessed.
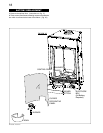
Note: Do not handle the lamp (bulb) with bare fi ngers,
protect with a clean dry cloth.
The lamp will pull straight out of the socket. Replace with
Wolf Steel parts only, as lamp and lens are special “high
temperature” products.
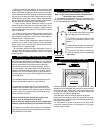
When re-installing, ensure integrity of gasket seal.
THE FIREBOX MUST BE SEALED.
Over tightening the screws could break the lens.
“Light Leakage” from the upper area may be observed.
The holes in the lamp housing are necessary for
ventilation and must not be blocked.
FIGURE 45
AMBER SIDE UP
GASKET
LENSE
FRAME
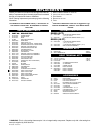
To operate this fi rplace using the remote, the pilot must be
running and the gas valve turned to the “ON” position. Ensure
that the receiver has power and the backup switch is in the
auto position.
OPERATION / MAINTENANCE
FIREPLACE OPERATION
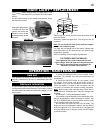
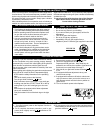
FIGURE 46
TIME OUT
If the appliance is turned on and the Receiver does not re-
ceive any command for 24 hours, it automatically turns the
appliance
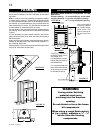
1. Install the batteries (AAA) into the remote control
transmitter. The “HOUSE” icon with room temperature will
be displayed.
2. Press the ON/OFF button on the remote. Icons
will appear at the same time and acoustic signal is
generated if not, move the transmitter closer to the re-
ceiver and repeat. If a signal is still not heard, it will be
necessary to execute the address setting procedure.
Note: There maybe a few seconds delay before the re-
ceiver responds. Especially when using the wrought iron
faceplate.
3. Fahrenheit - Celsius temperature indicator
It is possible to set the Remote Control transmitter to dis-
play the temperatures in either Fahrenheit or Celsius. Use
the UP or DOWN button on the transmitter until the cursor
(small triangle) is left of the clock icon.
4. From time 0:00 press the LEFT key ten times. The
display will show the transmitter address. Use the RIGHT
button to toggle from °F to °C and vice versa. The display will
show the selected unit of measure. Press the LEFT button
to exit this function.
FIGURE 46