


Special offers from our partners!

Find Replacement BBQ Parts for 20,308 Models. Repair your BBQ today.

Barbecue Owner’s Manual
www.calspas.com
G3000 Island / Sports Bar Canopy
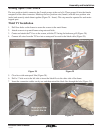
Canopy Wiring
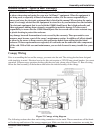
Prior to assembling the bar and the canopy, you must wire the unit. The wiring plan has been designed
with simplicity in mind. Electrical service for this unit requires a 120V/20 amp circuit breaker for correct
operation. If there are any questions dealing with the wire code, please refer to Figure 23. Run all wiring
before the final assembly of the barbecue and before the initial assembly of the canopy.
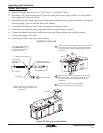
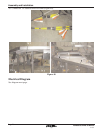
Figure 23. Canopy wiring diagram
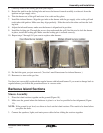
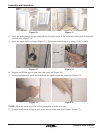
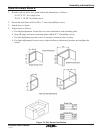
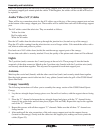
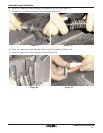
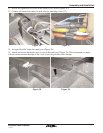
The following sections show how each wiring connection is to be made. These connections will be identi-
cal for the top and bottom of the canopy support post. Make sure that after the connections are made, the
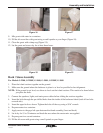
While the G3000 Island / Sports Bar Canopy is intended for outdoor use, some precautions must
be taken when using and caring for your new Cal Flame™ equipment. When the equipment is
not being used, or especially in times of inclement weather, it is the owners responsibility to
remove and store the electronic equipment that is listed in this manual. When storing the equip-
ment, it is strongly advised that the equipment be stored in a dry and moisture-free environment.
The electronic equipment that is used with the G3000 Island/Sports Bar is high-end audio and
video equipment, making them extremely susceptible to moisture damage. It is the owner’s
responsibility to ensure that the G3000 Island/Sports Bar be covered with a water-resistant tarp
or plastic sheeting to protect the enclosure.
Any damage incurred from moisture is not covered by the warranty. These preventative care
measures must become a part of the owner’s maintenance routine. In addition, all efforts should
be taken by the owner to keep excessive dirt and foreign debris from settling into the island
enclosure. If these requirements are neglected, all warranties on the audio and video components
will be void. With a little care and maintenance, you can look forward to many trouble-free years
of use.
Page 19
Assembly and Installation
12/17/04