


Special offers from our partners!

Find Replacement BBQ Parts for 20,308 Models. Repair your BBQ today.
Barbecue Owner’s Manual
www.calspas.com
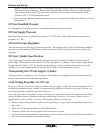
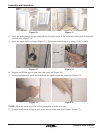
4. Carefully remove the locking pin with your fingers.
5. Raised the stud from the locking hole and move the burner forward carefully to release it from the
ignition and gas supply valve.
6. Take the burner out of the grill and store it in a safe and dry place.
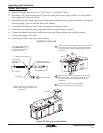
7. Install the infrared burner. Align the gas inlet on the burner with the gas supply valve on the grill and
torch tube with ignition. Make sure they align perfectly. Slide the stud at the other end into the lock-
ing hole.
8. Adjust the infrared burner, make sure the burner is aligned and in position.
9. Install the locking pin. Through the access door underneath the grill, find the stud to lock the burner
in place, install the locking pin. Make sure the locking pin is secured correctly.
10. Repeat steps 2 through 9 if you want to replace other burners.
Figure 9
11. Put back the grate you just removed. (You don’t need flame tamer for infrared burners.)
12. Reconnect or turn on the gas line.
You have just successfully replaced the regular burner with infrared burner. If you want to change back to
regular burners, just follow the procedure above in reverse order.
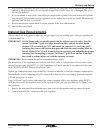
Barbecue Island Sections
Stucco Assembly
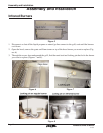
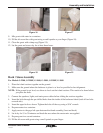
1. Place the island sections together on the ground (Figure 10).
2. Make sure the ground where the barbecue is place is as level as possible for best alignment (Figure
11).
NOTE: If the ground is not level, use shims to level out the island sections. This needs to be done before
you place the bolts.
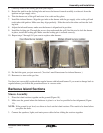
3. Connect the speakers, lights, and main power cables before sliding the sections together.
Page 11
Assembly and Installation
12/17/04