


Special offers from our partners!

Find Replacement BBQ Parts for 20,308 Models. Repair your BBQ today.

Barbecue Owner’s Manual
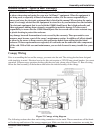
Assembly and Installation
www.calspas.com
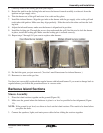
11. Clean the grout with a damp rag.
12. Let the grout and mortar dry for at least three hours.
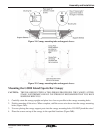
Granite Kit Instructions
Granite kits come in the following colors. Each contains various tinting colors as listed below:
Sapphire Brown New Venetian Gold Uba Tuba (Labrador) Giallo Veneziano
Black White Black Red-Brown
White Yellow White Yellow
Blue Blue Green Black
Brown White
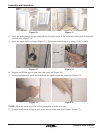
1. Pour a small amount of epoxy and a small drop of each tint color on a piece of a cardboard.
2. Apply a small amount of the first tint color to the epoxy material using a mixing stick.
3. Mix the epoxy material well with the first tint color.
Note: Refer to the granite tint color reference chart.
4. Apply a small amount of the second tint color to the epoxy mixture.
5. Mix the epoxy mixture well with the second tint color.
6. Apply a small amount of the next tint color to the epoxy mixture.
7. Mix the epoxy mixture well with the next tint color and compare it with the color of the granite top.
8. If the colors do not match, add a tiny amount of tint color (one at a time) and mix it until you match
the color of the granite top with the epoxy mixture.
9. Once you match the color of the epoxy mixture to the color of the granite top , apply and mix a tiny
amount of hardener to the epoxy mixture.
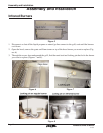
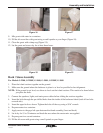
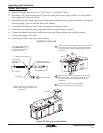
10. Quickly fill one portion of the seam line with the epoxy mixture using a razor blade.
11. Remove the excess epoxy material from the seam line using a razor blade.
12. Let the epoxy material cure for five minutes.
13. Mark small dots in the seam line using a black permanent marker.
14. Pour a small amount of epoxy and hardener separately on a piece of cardboard.
15. Mix the epoxy material well with the hardener.
16. Quickly apply the epoxy mixture to the seam line with a razor blade.
17. Remove the excess epoxy material from the seam line using a razor blade.
18. Let the epoxy material cure for five minutes.
19. Repeat the previous steps until all the seam line is filled with epoxy mixture.
20. Clean the surface of the seam line with acetone.
Page 14
12/17/04