


Special offers from our partners!

Find Replacement BBQ Parts for 20,308 Models. Repair your BBQ today.

6
Regency IG35 Gas Inbuilt Fireplace
INSTALLATION
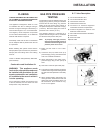
GAS CONNECTION
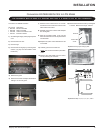
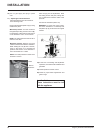
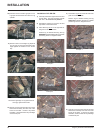
3) Locate the center point where the fl ue will
pass through the chimney above the appli-
ance. Move the appliance into the exact
location where it is to be installed. Ensure
that the Insert is level.
CAUTION: If the glass is removed for servic-
ing, it must be replaced and closed prior to
operating the appliance.
GAS CONNECTION WARNING:
Only persons licensed to work
with gas piping may make the
necessary gas connections to this
appliance.
1) If the appliance is to be installed into an
existing chimney system or Zero Clearance
Box, thoroughly clean the masonry or factory
built fi replace.
2) The gas connection is 1/2" BSP.
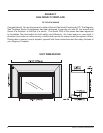
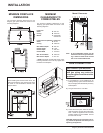
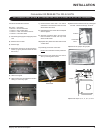
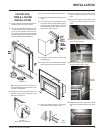
Mantel Clearances
MINIMUM FIREPLACE
DIMENSIONS
The minimum fi replace dimensions for the
Regency gas space heater are shown in the
following diagrams:
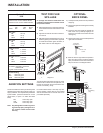
Note: A non-combustible mantel may be
installed at a lower height if the fram-
ing is made of metal studs covered
with a non-combustible board.
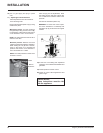
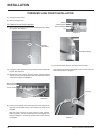
MINIMUM
CLEARANCES TO
COMBUSTIBLES
The minimum fi replace clearances for the
Regency gas space heater are shown in the
following diagrams:
From Unit:
Sides A 250 mm
Ceiling B 1220 mm
Mantel C see Mantel
Clearances
From Surround (660 mm x 1016 mm):
Sides D 96 mm
Ceiling E 1066 mm
Max. Mantle Depth G 305 mm
Hearth Height H 0 mm
Hearth Depth I 300 mm*
Hearth Width J 1100 mm
Min. Alcove Width K 1262 mm
Max. Alcove Depth L 915 mm
* NOTE: No hearth required with screen. Floor
fi nishing material must not be any higher then
the base of the fi replace.
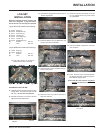
Premium Flush Front Framing
When installing the Premium Flush Front, the
walls surrounding the zero clearance kit must
be made of non-combustible material. See
Diagram below.