


Special offers from our partners!

Find Replacement BBQ Parts for 20,308 Models. Repair your BBQ today.

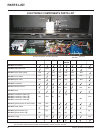
23
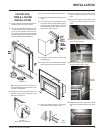
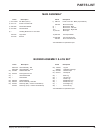
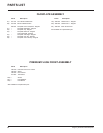
Regency IG35 Gas Inbuilt Fireplace
OPERATING INSTRUCTIONS
OPERATING
INSTRUCTIONS
Before operating this appliance, proceed through
the following check list.
1) Read and understand these Instructions
before operating this appliance.
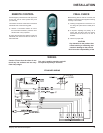
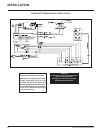
2) Check to see that all wiring is correct and
enclosed to prevent possible shock.
3) Check to ensure there are no gas leaks.
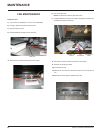
4) Make sure the glass door is in place. Never
operate the appliance with the door glass
removed.
5) Verify that all fl ueing and the cap is unob-
structed.
6) Verify log placement.
7) The unit should never be turned off and on
again without a minimum of a 60 second
wait.
8) When lighting the appliance, the inside of
the glass may fog up. This will burn off after
a few minutes of operation.
LIGHTING
INSTRUCTIONS
1) Plug the power cord into a power outlet.
2) Press and release the ON/OFF switch once
to start the unit. The LED will be lit.
3) After approximately 8 seconds the spark
ignition system will spark for 8 seconds to
light the main burner.
4) If the main burner does not light, repeat step
2 to restart the unit.
SHUTDOWN
INSTRUCTIONS
1) Press the ON/OFF switch once.
2) The LED will fl ash.
3) Turn off all electric power to the appliance
if service is to be performed.
FIRST FIRE
The FIRST FIRE in your heater is part of the
paint curing process. To ensure that the paint
is properly cured, it is recommended that you
burn your fi replace for at least four (4) hours the
fi rst time you use it with the fan on.
When fi rst operated, the unit will release an
odour caused by the curing of the paint and the
burning off of any oils remaining from manufac-
turing. Smoke detectors in the house may go off
at this time. Open a few windows to ventilate
the room for a couple of hours. The glass may
require cleaning.
NOTE: The main burner will always start on
"HIGH" and resume it's last setting after
20 seconds of operation.
NOTE: When the glass is cold and the appliance
is lit, it may cause condensation and fog
the glass. This condensation is normal
and will disappear in a few minutes as
the glass heats up.
DO NOT ATTEMPT TO CLEAN THE
GLASS WHILE IT IS STILL HOT!
DO NOT BURN THE APPLIANCE WITH-
OUT THE GLASS FRONT IN PLACE.
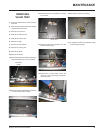
FAN OPERATION
Set the fan speed on the control panel at the top
rear of the unit to adjust to the desired speed.
Pressing and releasing the plus (+) FAN button
will change the fan speed as follows:
OFF -> LOW -> MEDIUM -> HIGH -> OFF,
etc.
Pressing and releasing the minus (-) FAN button
will be the reverse of the above.
ADJUSTING FLAME
HEIGHT
There are six fl ame settings that can be adjusted
by pressing and releasing the plus (+) and minus
(-) FLAME button.
The FLAME setting button is located on the
control panel at the top rear of the unit.
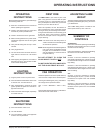
SUMMARY OF
CONTROLS
On/Off Button
If the unit is switched off, pressing and releasing
this button once will switch the unit on. The unit
will resume its last settings.
If the unit is switched on, pressing and releasing
this button once will switch the unit off.
Flame:
Increase - If the unit is switched on, pressing
and releasing the fl ame plus (+) button once will
increase the fl ame height to the next available
high setting.
Decrease - If the unit is switched on, pressing
and releasing the fl ame minus (-) button once
will decrease the fl ame height to the next avail-
able low setting.
Fan:
Increase - If the unit is switched on, pressing
and releasing the fan plus (+) button once will
increase the fan speed to the next available
high setting.
Decrease - If the unit is switched on, pressing
and releasing the fan minus (-) button once will
decrease the fan speed to the next available
low setting.