


Special offers from our partners!

Find Replacement BBQ Parts for 20,308 Models. Repair your BBQ today.

89
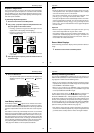
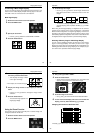
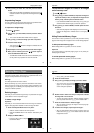
Using the Camera with a Connected Device
Computer (Video Capture)
VIDEO
You can use the special video cable that comes with the camera to
connect directly to the VIDEO IN terminal of a personal computer
equipped with video capture capabilities.
To transfer camera images to a personal computer (video
capture)
1. Use the special video cable that comes with the camera to connect
to the VIDEO IN terminal of the computer.
2. Enter the camera Playback Mode and display the image you want
to send.
3. Perform the required operation on the computer.
• Consult the owner’s guide that comes with the computer or its video
capture board for details about how to set up to capture images.
Important!
• With this configuration, you cannot send images from the personal
computer to the camera.
• The camera can be connected directly to a personal computer or
video capture board that is equipped with a VIDEO IN terminal
(RCA pin jack). It cannot be connected directly to an S-VIDEO ter-
minal.
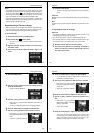
Using the Camera with a Connected Device
90
Accessing Memory Card Contents with
Your Computer
You can use any of the three methods described below to access the
contents of a memory card with your computer.
Important!
QV-LINK software is required to use your computer to view images
stored on a memory card.
Memory Card Slot
If your computer has a memory card slot, insert the camera’s memory
card into the slot.
PC Card Slot
In this case you need an optionally available CASIO CA-10 PC Card
Adaptor. See the instructions that come with the PC Card Adaptor
and the documentation that comes with your computer for details on
using this type of configuration.
Other Desktop Computer Configurations
Some desktop computers require a separately available PC card
reader/writer and the optionally available CASIO CA-10 PC Card
Adaptor to read memory card contents. See the instructions that
come with the PC card reader/writer and the PC Card Adaptor for
details on using this type of configuration.
91
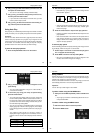
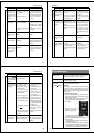
Troubleshooting
No power
Sudden power
failure
indicator
on LCD
No recording
when shutter
button is
pressed
Power failure
during self-timer
operation
1. Batteries not loaded
correctly.
2. Dead batteries
3. Wrong AC adaptor
4. Open memory card
slot cover
1. Operation of Auto
Power Off
2. Low battery power
3. Use of manganese
batteries.
Batteries are about to go
dead.
1. Function switch sets to
PLAY.
2. Insufficient memory
card capacity or no
memory card loaded in
camera
Low battery power
1. Correctly load batter-
ies (page 22).
2. Replace batteries with
new ones (page 22).
3. Use only recom-
mended AC adaptor .
4. Securely close memory
card slot cover.
1. Turn power back on.
2. Replace batteries with
new ones (page 22).
3. Replace manganese
batteries with alkaline
batteries.
Replace all four batteries
with a set of new ones
(page 22).
1. Set function switch to
REC.
2. Load a memory card
Replace batteries (page
22).
Symptom Probable Cause Action
Power Supply
Recording
92
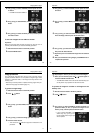
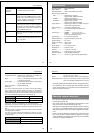
Reference
Symptom Probable Cause Action
Poor LCD image
focus
Poor color and
brightness when
indoors
Color of
recorded image
is strange.
No +/– button
operation during
multi-page dis-
play
All pages do not
appear during
auto play.
Use NORMAL for scen-
ery and group photos,
and MACRO for close-
ups (page 36).
Shoot under incandes-
cent or other non-fluores-
cent lighting (page 33).
Reorient the camera so
that light is not shining di-
rectly into lens.
Wait until an image is on
the LCD before perform-
ing a button operation.
1.Unhide protected
memory pages (page
74).
2. Correctly select folder
that contains images.
Incorrect NORMAL/
MACRO switch setting
Indoor fluorescent lighting
Reflection from sunlight
or light from another
source
Button operation during
page change
1. Protected memory
pages are hidden.
2. Images are in a dif-
ferent folder.
Recording
Playback