


Special offers from our partners!

Find Replacement BBQ Parts for 20,308 Models. Repair your BBQ today.

53
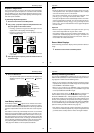
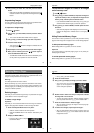
Playing Back Images
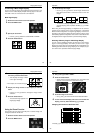
Producing a Multi-Page Display
Four or nine memory pages can be displayed at the same time. This
feature can be used to display multiple memory pages on the cam-
era's built-in LCD, or on the screen of a connected TV.
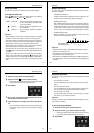
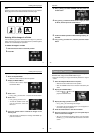
Multi-Page Display
1. Slide the function switch to the PLAY position.
2. Press the MENU button.
3. Specify the screen size.
• Use the [+] and [–] buttons to select 4PAGE or 9PAGE.
4. Press the shutter button.
Operation
54
5. Scroll through the images.
• Use the [+] and [–] buttons to scroll images forward and
back. Each press shows a new screen of four or nine new
images.
• To clear the multi-page display and return to the normal sin-
gle-page display, press any button besides [+], [–] or DISP
button.
When using the multi-page display, the brightness of the camera’s
monitor screen and the screen of the connected TV is somewhat
different from the brightness of a single-image display. This is due to
operation of the camera’s AGC(Auto Gain Control) function, which
automatically adjusts the brightness of the screen in accordance with
the brightest of the images that make up the multi-image display.
Selecting a Memory Page in a Multi-Page Display
You can use the following procedure to select one of the memory
pages in a multi-page display. Then when you return to the 1-page
display, the memory page you selected will be the one displayed. The
following procedure uses the 4-page display as an example, but you
can use the same procedure with the 9-page display.
55
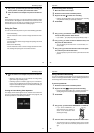
Playing Back Images
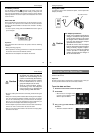
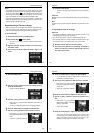
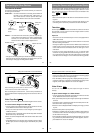
1. While a multi-page display (either 4-page or 9-page) is on
the screen, press the DISP button.
• This displays the image number
on the upper left image.
2. Display the image number of the images you want to
select.
• Use the [+] and [–] buttons to change the image number
selection.
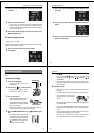
3. Press the shutter button.
• The selected image appears on a
single-page display.
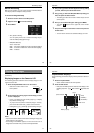
Using the Zoom Function
This function lets you select a specific part of a stored image and
enlarge it to twice its normal size.
1. Slide the function switch to the PLAY position.
2. Press the MENU button.
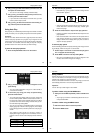
1F
In this example, we will select this page.
Operation
56
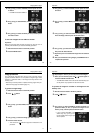
3. Use [+] and [–] to select “ZOOM”.
4. Press the shutter button.
• At this time the image is doubled in size. The portion that
appears on the screen is the center of the image.
5. Scroll the image on the screen.
• Use [+] and [–] to scroll as shown in the illustration below.
6. To clear the zoomed display and return to the normal size
display, press any button besides [+], [–], or DISP.
Changing the Location of the Zoom Area
• Pressing [–] moves the zoom area in the opposite direction.