


Special offers from our partners!

Find Replacement BBQ Parts for 20,308 Models. Repair your BBQ today.

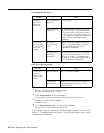
Step 3: Connecting the Voice Terminals
Any of the following voice terminal models will work at any voice terminal
location connected to your MERLIN Plus system:
●
●
●
●
●
●
●
●
●
●
●
5-Button voice terminal
BIS-10 voice terminal
10-Button voice terminal
10-Button voice terminal with Hands Free Answer on Intercom
(HFAI-10)
BIS-22 voice terminal
BIS-34D with Display voice terminal
BIS-34 voice terminal
34-Button (SP-34) voice terminal with speakerphone
34-Button (SP-34) voice terminal with speakerphone and display
34-Button deluxe voice terminal
34-Button voice terminal
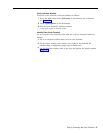
PREPARE THE VOICE
TERMINALS
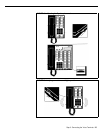
Assign voice terminals to their locations based on the requirements of your
system and the needs of individual users. For example, an
attendant/receptionist at the intercom 10 location will require a BIS-34D, 34-
Button or 22-Button voice terminal. Refer to your completed System
Configuration Form when necessary.
The following items come boxed together:
●
●
●
●
●
●
Voice terminal body
Handset
Coiled handset cord
Modular voice terminal cord
Desk stand and/or wall mount
Instructions for assembling the voice terminal
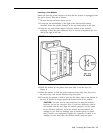
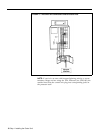
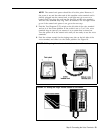
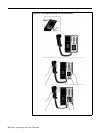
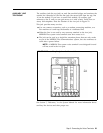
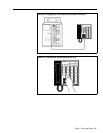
See Figure 17 as you prepare each voice terminal for connection to the system
as follows:
1
Attach the desk stand or wall mount to the voice terminal body according
to the instructions that came with the components.
2
Plug one end of the coiled handset cord into the handset.
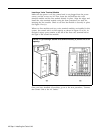
3
Plug the other end of the coiled handset cord into the jack near the
handset rest at the lower edge of the voice terminal body. The jack also
may be located at the base of the voice terminal body and have a handset
symbol next to it.
4
Plug the modular voice terminal cord into the jack labeled "Line" at the
base of the voice terminal.
22
Step 3: Connecting the Voice Terminals