


Special offers from our partners!

Find Replacement BBQ Parts for 20,308 Models. Repair your BBQ today.

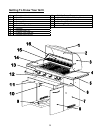
18
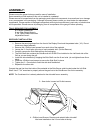
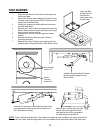
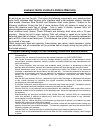
SIDE BURNER
1 Open the side burner lid and remove the grate over
the burner head.
2 Undo the 2 Phillips head screws that hold the Flame
Thrower (burner ignition) and VERY Carefully move
away from the burner Head.
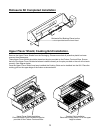
3 Undo the 3 screws that hold the Burner Head onto
the Side Shelf base.
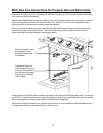
4 Remove the 2 main orifices and place away from the
Natural Gas conversion kit so the orifices will not get
mixed up with the new orifices.
5 Replace the 2 orifices using an approved thread
sealant.
6 Reinstall the Burner head using the 3 screws
previously removed.
7 Reinstall the Flame Thrower ensuring that the tip is
properly placed inside the bottom of the Burner Head.
NOTE:
These 2 orifices look the same. The smaller size orifice is to be installed in the center outlet of the
Side Burner Gas Valve. And the larger orifice is to be installed on the right hand outlet of the Gas Valve.
Open the Side
Burner Lid and
Remove the
Grate above the
Burner head.
Burner Head
screws X 3
Flame
Thrower
screws X 2
Carefully move the Flame Thrower
(Burner ignition) away from the
Burner Head.
Undo the 3 screws that hold the Burner Head to the
base plate and carefully move Burner Head off of
the 2 Side Burner orifices
Remove the 2 orifices from the Side
Burner Valve and replace with the
new Natural gas Orifices supplied in
the Natural gas conversion kit