


Special offers from our partners!

Find Replacement BBQ Parts for 20,308 Models. Repair your BBQ today.

16
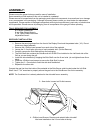
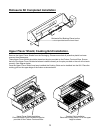
Operating The Rear Burner
When operating the Rear Burner please ensure that the Warming Rack is REMOVED. The Warming Rack will
become damaged if NOT removed while the Rear Infrared Burner is in use.
The rear burner is specially designed to be used with the Rotisserie Kit, and should ONLY be used when
using the Rotisserie Kit.
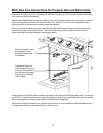
MAIN BURNER USE
When searing foods, preheating is recommended by operating all main burners in the HI position with the lid
closed for approximately 10 minutes.
Cooking with the lid closed will ensure a more even temperature that will reduce cooking time and cook more
evenly.
Food that has a cooking time longer than 30 minutes, such as roasts, may be cooked indirectly (with the burner lit
opposite the food placement).
When cooking very lean meats, such as chicken breasts or lean pork, the grids can be oiled before cooking to
prevent sticking.
Cooking meat with a high degree of fat content may create flare-ups. Either trim some fat or reduce temperatures
to prevent this. Should a flare up occur, move the food away from the flames, reduce heat and leave the lid open.
NATURAL GAS INSTALLATIONS.
Tools Required to Convert this grill from Propane Gas to Natural Gas:
# 2 Phillips screwdriver
9 and 7 mm wrenches
13 mm wrench
¾” wrench
Adjustable Wrench
The outdoor cooking gas appliance and its’ individual shut off valve must be disconnected from the gas
supply piping system during any pressure testing of that system at test pressures in excess of ½ psi (3.5
kPa).
The outdoor cooking gas appliance must be isolated from the gas supply by closing its’ individual manual shut
off valve during any pressure testing of the gas supply piping system at test pressures equal to or less than ½
psi (3.5 kPa).
CONVERTING FROM PROPANE GAS(LP) TO NATURAL GAS
A qualified gas installer should perform all gas conversion. This appliance should only be converted
with conversion kit NG-CONVERSION KIT
. This conversion kit is supplied with this grill.
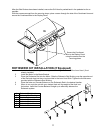
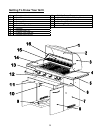
MAIN BURNER ORIFICES
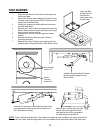
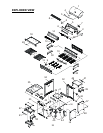
1 Remove the Cooking Grids and Upper Flavor Shields.
2 Using a # 2 Phillips Screw Driver remove the screw that hold the main burners to the firebox rear
wall.
3 Pull the Grease Pan all the way out. Press on the 2 Blue clips on the side of the Grease pan and
totally remove the Grease Pan.