


Special offers from our partners!

Find Replacement BBQ Parts for 20,308 Models. Repair your BBQ today.

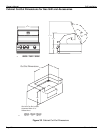
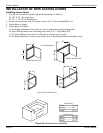
Sports Bar Canopy Owner’s Manual
Owner’s Manual Page 36
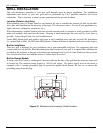
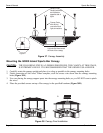
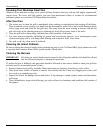
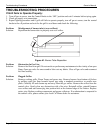
Figure 39. Awning Installation
Awning Open/ Close Switch
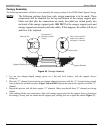
NOTE: The 2-position (male) connector has 2 metal prongs at the end of it. These prongs fit into the female
receptacle of the other connector.
1. Match up the 2-position wire (female) with the 2-position wire (male) and securely attach them together
(Figure 39 - Insert). This step must be repeated for each main support post.
Front of Canopy
Awning
Frame
Side View
Frame Bracket
Side View
Set Screw (2 each)
Important: You must use set screws
to hold the awning in place.
Flat-Head Phillips (1 each)
Carriage Bolt (2 each)
Electrical Connections
Side View
A
B
C
D
Awning Installation
With the canopy installation nearly complete, the awning must be installed and wired. It should be noted that all
screws that are used for the installation of the awning are self-tapping sheet metal screws. No drilling should be
necessary.
1. Line up the holes for the awning bracket with the corresponding pre-drilled holes on the awning. Use two
carriage bolts for the upper two holes and a flat-head Phillips for the single lower hole. Tighten until snug,
but don’t over-tighten (Figure 39A).
2. After mounting the awning bracket, remove the awning from the box. Tilt the awning at a 45˚ angle and hang
the awning onto the awning bracket (Figure 39B).
3. After making sure that the awning is securely hung onto the awning bracket, tilt the awning up to a 45˚ angle
(again) and connect the two electrical leads (male) securely to the two electrical leads (female, attached to
the awning). When complete, carefully tuck the wires into the hole and gently lower the awning
(Figure 39C).
4. Place set-screws through the awning bracket and awning into the canopy frame. Do not over-tighten
(Figure 39D).