


Special offers from our partners!

Find Replacement BBQ Parts for 20,308 Models. Repair your BBQ today.

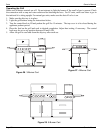
Owner’s Manual Page 28
Grill Installation Owner’s Manual
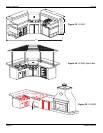
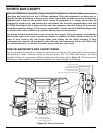
Rotisserie & Accessory Outlet
GRILL INSTALLATION
Safe and satisfactory operation of your new grill depends upon its proper installation. The installation,
adjustments and service of your new grill must be performed by C.A.I. qualified installers and service
technicians. This is necessary to ensure proper operation and also prevent accidents.
Location (Outdoor Use Only)
When planning your Cal Flame Island or cart location, be sure to consider the shortest gas line run possible.
Also, take into consideration the necessity of having a 110 volts power source. For use of your appliances (i.e.
lights, rotisserie, refrigerator, receptacles, etc.).
When determining a suitable location, take into account concerns such as exposure to wind, proximity to traffic
paths, and windows that open into the home. Keeping in mind natural gas line runs need to be as short as
possible. Locate the grill only in a well ventilated area
Locate BBQ Islands grills and stainless steel carts in well ventilated areas, and only on solid, flat foundations
(i.e. cement slab or deck). Do NOT place BBQ Islands / Outdoor Kitchens or stainless steel carts on dirt or grass.
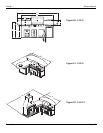
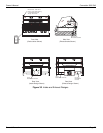
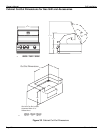
Built-in Installation
Your new grill is designed for easy installation into a non-combustible enclosure. The supporting deck and
counter must be level and flat. When determining the final location of your grill, it is required that ventilation be
provided in the enclosure so that gas will not become entrapped in the event of a leak. Make sure that you have
one vent placed at floor level and the other at 5 inches above floor level.
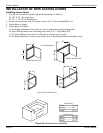
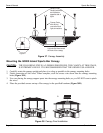
Built-in Design Models
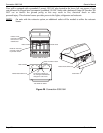
If using a rear wall, locate a weatherproof electrical outlet on the side of the grill that the rotisserie motor will
be located on. The rotisserie motor requires a 110/120-volt supply. The power supply cord on the motor is
equipped with a 3-prong (grounded) plug for protection against shock hazard. Do not cut or remove the
grounding prong from the plug.
Figure 31. Rotisserie and Accessory Outlet Location