


Special offers from our partners!

Find Replacement BBQ Parts for 20,308 Models. Repair your BBQ today.

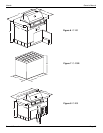
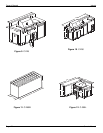
Drop-In Grills Owner’s Manual
Owner’s Manual Page 10
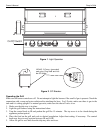
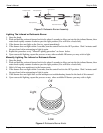
Lighting The Grill Burners
1. Open the hood.
2. Keep your face as far away from the burners as possible.
3. Rapidly rotate the burner knob counter clockwise past light position (You will hear a loud click) to high.
4. Listen for the "Whoosh" sound. If the burner does not light on the first try, repeat immediately.
5. If the burner does not light after three attempts, turn the control knobs to the OFF position. Wait 5 minutes
until the gas clears before attempting to light it again.
7. Repeat the procedure or try "Manual Lighting procedure" below.
8. Upon successful lighting, repeat the process on the other burners you wish to light.
9. To shut off burners rotate knob and turn to OFF. It is normal to hear a popping sound when the burners
returned off.
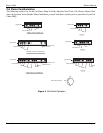
Manually Lighting The Grill Burners
1. Open the hood.
2. If you have just attempted to light the burner, allow 5 minutes for any accumulated gas to dissipate.
3. Slide out the drip tray from the grill.
4. Keep your face as far away from the burners as possible.
5. Using only a long stem match, hold near the burner ports.
6. Push in and turn counter clockwise the grills gas control knob just past the LIGHT position to HIGH.
7. Listen for the "Whoosh" sound. If the burner does not light after 5 seconds, turn the control knobs to the
OFF position. Wait 5 minutes until the gas clears before attempting to light it again.
8. If the burner does not light after several attempts see Troubleshooting Guide in the back of this manual.
Using Your Rotisserie
The rotisserie burner is an infrared type, which provides intense searing radiant heat. Preferred by professional
chefs over other methods, this intense heat is ideal for searing in the natural juices and nutrients found in qual-
ity cuts of meat.
Cooking with the Rotisserie
The rotisserie system is designed to cook items from the back using infrared heat. The location of the burner
allows the placement of a rotisserie-basting pan (included) beneath the food to collect juices and drippings for
basting and gravy. To flavor the contents of the basting pan, you can add herbs, onion, garlic, or spices.
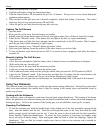
Operating The Rotisserie
1. To load the rotisserie rod, hold the handle firmly while sliding one of the fork assemblies (prongs facing
away from the handle) onto the rod. Push the rod through the center of the food, then slide the other
holder (prongs toward the food) onto the rod. Center the meat on the rod and push the fork assemblies
firmly together. Tighten the thumbscrews. To secure any loose portions of your meat, use butcher string
(never use nylon or plastic string). Place basting pan under the food to collect the drippings.
2. To use the rotisserie, first mount the motor on the left side of the grill. Place securely onto support bracket.
3. The rod of the rotisserie system is assembled into the motor by placing the pointed end into the motor and
resting the threaded end on the support at the side of the grill. Once the rod is pushed as far as possible into
the motor, the grooved end of the rod should rest on the right side bracket.
4. If necessary, to offset unbalanced loads, slide the counter weight on to the rod. With the counter weight
loose, allow the loaded rod to rotate and come to a stop. Now rotate the counter weight above the rod in a
vertical position and tighten the thumbscrew. You can slide the counter weight away from or closer to the
rotisserie rod as needed for balanced operation. Once lit, the rotisserie burner will reach cooking
temperature in about 1 minute. The orange/red glow will even out in about 5 minutes.