


Special offers from our partners!

Find Replacement BBQ Parts for 20,308 Models. Repair your BBQ today.

15
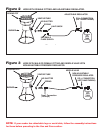
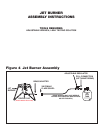
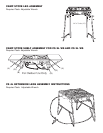
95 PKP LEG ASSEMBLY
Required Tools: Adjustable Wrench
1. Match the holes in each leg with the
corresponding holes in the cooker.
2. Slide one 1/4” x 1” bolt through each of the
twelve holes. These should be directed
inward as in the illustration so that the nuts
will be on the inside of the assembly.
3. Screw 1/4” nut onto each bolt and wrench
tighten. Make certain every bolt and nut
assembly is completely tightened so the unit
will stand sturdily, with no sway, when the
unit is upright.
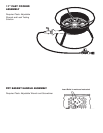
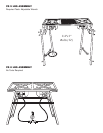
84 PK, 84 PKJ, 86 PK, 86 PKJ
LEG ASSEMBLY
No Tools Needed
1. Place burner unit upside down on the floor.
2. Put one leg, notched end down, onto a half inch
round bar brace where it connects to the outer ring.
Slide the slot onto the bottom ring on the burner.
Repeat for each of the other two legs.
3. Slide the carriage bolts through the center
bracket. Slide a bolt through a hole in each leg. Screw
the wing nut to the ends of the carriage bolts and
tighten completely.
4. Turn burner right side up and place on the level
surface for cooking.
1/4"x1" Bolts (12)
/16" X
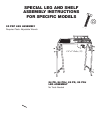
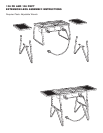
SPECIAL LEG AND SHELF
ASSEMBLY INSTRUCTIONS
FOR SPECIFIC MODELS