


Special offers from our partners!

Find Replacement BBQ Parts for 20,308 Models. Repair your BBQ today.

10
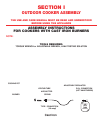
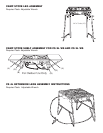
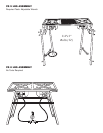
NOTE: If your cooker has attachable legs or work table, follow the assembly instructions
for these before proceding to the Use and Care section.
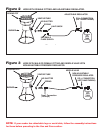
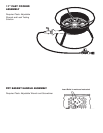
Figure 2
LP
GAS
TANK
COOKING POT
VENTURI TUBE
AIR SHUTTER
SPRING
3/8 FEMALE
FLARE SWIVEL
BURNER
ADJUSTABLE REGULATOR
P.O.L. CONNECTION
(LEFT HAND THREAD)
N
O
HALF UNION
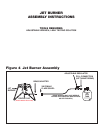
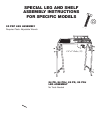
Figure 3
LP
GAS
TANK
COOKING POT
VENTURI TUBE
AIR SHUTTER
SPRING
Type1 Connection
(1/8 mnpt)
BURNER
NEEDLE VALVE
P.O.L. CONNECTION
(LEFT HAND THREAD)
PRESSURE REGULATOR
NON-ADJUSTABLE
Figure 2 HOSE WITH FEMALE FITTING AND ADJUSTABLE REGULATOR.
Figure 3
HOSE WITH MALE OR FEMALE FITTING AND NEEDLE VALVE WITH
NON-ADJUSTABLE PRESSURE REGULATOR.
The air shutter, spring and half union as pictured should already be assembled to the casting.
Check that fitting is tightened to the venturi tube and that the elbow points downward. If loose,
wrench tighten the 3/8 female flare swivel to the brass half union.
If your cooker has a needle valve and a non-adjustable pressure regulator as above with a Type 1
connection, refer to directions in Figure 1.
If your cooker has a needle valve and a non-adjustable pressure regulator as above, but a Type 2
connection, refer to the directions for Figure 2.
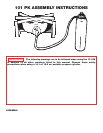
4. Go to the Use and Care Section for further instructions.