


Special offers from our partners!

Find Replacement BBQ Parts for 20,308 Models. Repair your BBQ today.
V
V
E
E
N
N
T
T
I
I
N
N
S
S
T
T
A
A
L
L
L
L
A
A
T
T
I
I
O
O
N
N
12
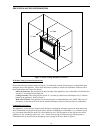
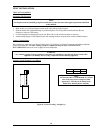
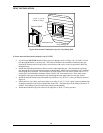
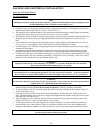
Horizontal Venting with Three (3) Elbows:
Figure 11: Horizontal Venting with Three (3) Elbows
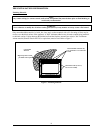
INSTALLING VENT COMPONENTS
Before You Start:
Plan your installation. Set unit in place and survey how best to vent the unit. Select the appropriate pipe for the
installation. Read this manual and the manual with the termination cap thoroughly before installing unit or vent
system. After vent configuration has been decided, begin attaching pipe to unit.
Piping Installations:
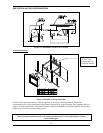
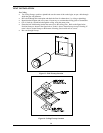
1. Remove the cover plate on top of the fireplace using a Philips screwdriver.
2. Attached the first piece piping (elbow or straight pipe) to the pipe connector located inside the fireplace.
All vent pipes will lock into place by sliding the sections together. Nest the 4 indentations on the female
end of one pipe into the slots of the pipe connector and then twist the pipe together (Refer to the
instructions that comes with termination for more detailed explanation).
3. Continue to add vent components. Be certain that each section is locked properly.
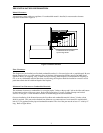
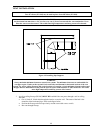
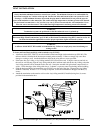
4. Where necessary add support brackets. Refer to the figure below. Horizontal runs must be supported every
3 feet using wall straps (P/N 988). Vertical runs must be supported every 8 feet using wall straps (P/N
988). Slip wall straps loosely on to pipe. Attach straps to framing members using nails or screws. Tighten
nut/bolt to secure pipe.
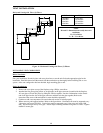
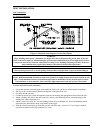
V, Vertical H, Horizontal
1 foot Min 5 feet Max
2 feet Min 10 feet Max
3 feet Min 15 feet Max
4 feet Min 20 feet Max
NOTE
H1 and V1 dimension must satisfy these two
conditions:
H + H1 << 20 feet
V + H + V1 << 40 feet.