


Special offers from our partners!

Find Replacement BBQ Parts for 20,308 Models. Repair your BBQ today.
PART #4521777 (03/19/08)
GARLAND ELECTRIC CLAMSHELL GRILL WITH PRODUCT RECOGNITION MODEL MWE3W INSTALLATION/OPERATION MANUAL
Page 23
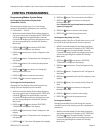
PROBE CALIBRATION
Monthly Calibration of Grill Temperature Zones
Tools: Digital Pyrometer with Surface Probe
Warning: PERSONAL INJURY FROM BURNS MAY RESULT
WHEN COMING IN CONTACT WITH HOT COOKING
SURFACES.
NOTE: Calibration of grills is done with release material
sheets “OFF”.
PLEASE FOLLOW THESE INSTRUCTIONS EXACTLY
AS THEY APPEAR BELOW:
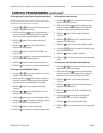
1. The upper platens and lower grill plate should be at
operating temperatures to perform this calibration
procedure. Press the or button to select a
“CLAM” operation and allow the grill to reach the set
temperature and stabilize, (approximately 30 minutes).
2. PRESS and HOLD the button for approximately
3 seconds, or until the controller will displays:
“PROBE CAL”.
3. PRESS the button to display the first temperature
zone to be calibrated. The first zone to be calibrated is
“FRONT TEMP CAL”. The zones are displayed in order of
FRONT TEMP CAL, MIDDLE TEMP CAL, BACK TEMP CAL,
TOP TEMP CAL.
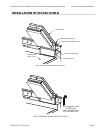
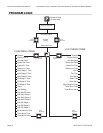
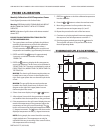
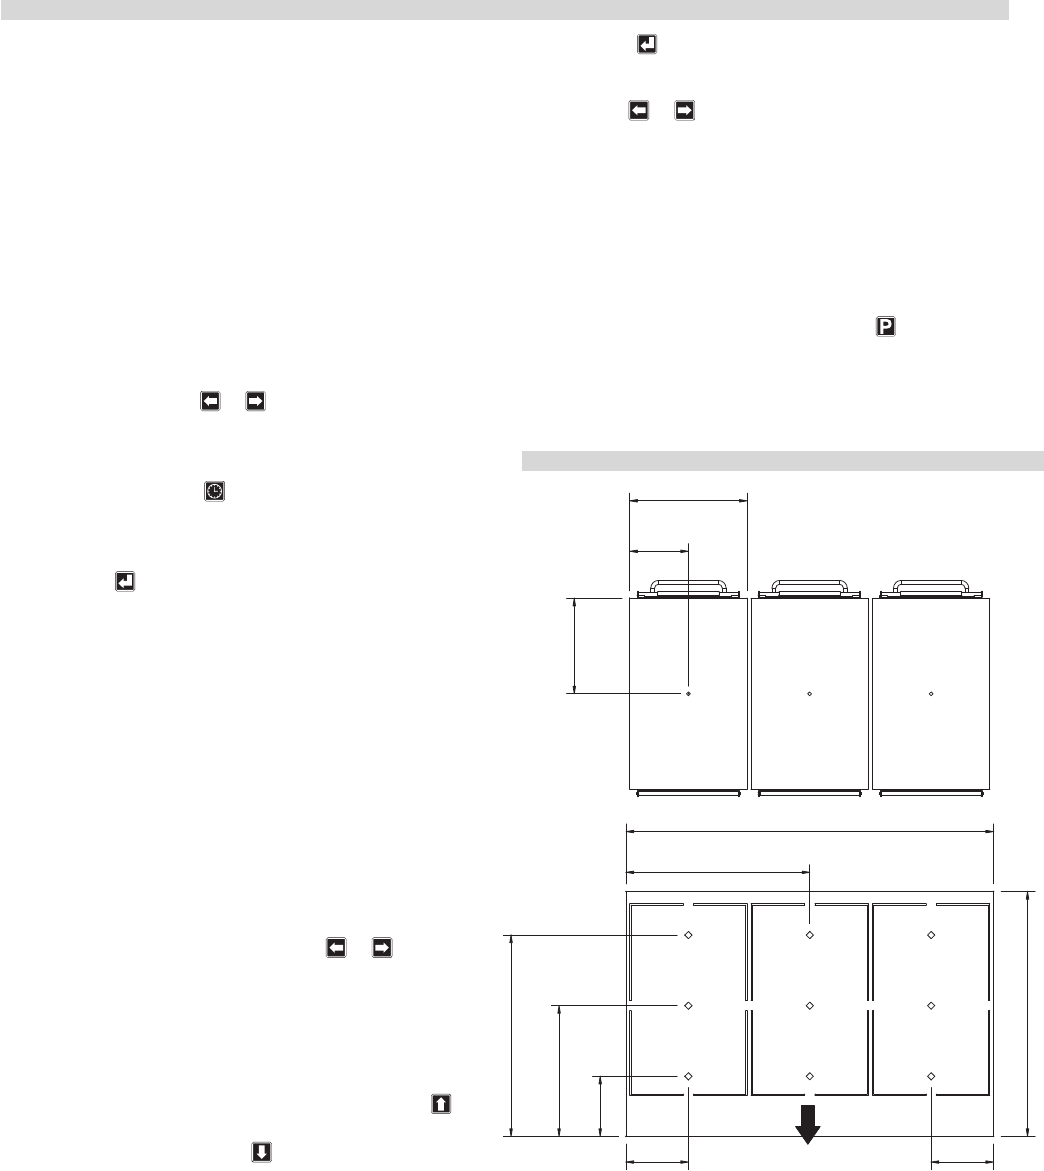
MWE3W: The electric grill’s thermocouple probes are
located front to rear, as shown in the diagram to the
right. Each upper platen has one thermocouple in the
center.
MWG3W: The gas grill’s thermocouple probes are
located in the center of each lane, as shown in the
diagram to the right. Each upper platen has one
thermocouple in the center.
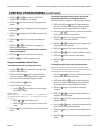
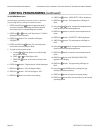
4. Select a heat zone display using the or buttons.
5. Allow at least 5 seconds for the pyrometer to respond
and stabilize. Note the temperature on the pyrometer.
6. If the temperature on the grill control display does not
match the temperature on the pyrometer, adjust the
temperature on the grill control accordingly. The
button will increase the displayed temperature in one,
(1) degree increments. The button will decrease the
displayed temperature in one, (1), degree Increments.
NOTE: During step 6, the control should be sounding
a high-pitched tone. The temperature can only be
adjusted if this tone is sounding. If the control is silent,
the temperature will not change.
7. PRESS the button to lock the calibrated temperature
into the controller.
8. Press the or button to select the next heat zone.
9. Move the pyrometer’s surface probe to the newly
selected heat zone and repeat steps 5, 6, and 7.
10. Repeat the procedure for each of the heat zones.
11. Continue to cycle through each heat zone repeating
the sequence until all temperatures are within 1°.
12. Exit the program mode by pressing the button 2x.
The controller will return to its previous state in the
Normal Operating Mode.
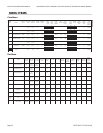
THERMOCOUPLE LOCATIONS
FRONT
OF GRILL
6.110
[155mm]
5.896
[150mm]
18.000
[457mm]
6.110
[155mm]
24.000
[610mm]
PLATEN THERMOCOUPLE
LOCATIONS (VIEW FROM BOTTOM)
9.360
[238mm]
(FROM FRONT
OF PLATEN)
5.750
[146mm]
36.000
[914mm]
12.814
[325mm]
19.732
[501mm]
11.500
[292mm]