


Special offers from our partners!

Find Replacement BBQ Parts for 20,308 Models. Repair your BBQ today.
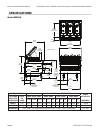
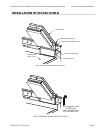
INSTALLATION/OPERATION MANUAL GARLAND ELECTRIC CLAMSHELL GRILL WITH PRODUCT RECOGNITION MODEL MWE3W
PART #4521777 (03/19/08)Page 16
OPERATING PROCEDURES (continued)
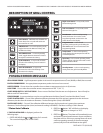
Indicator Lights
There are four (4) indicator lights on the main control.
The LED lights indicate the temperature status of each
zone. There are two (4) zones per section of the grill, TOP,
(platen), BACK GRILL, MIDDLE GRILL, and FRONT GRILL.
RED – The zone(s) is “TOO HOT” (more than 79˚F/43˚C over
set temperature) OR a heat zone failure has occurred.
AMBER – The zone(s) is calling for heat.
GREEN – The zone(s) is at or above set temperature, but
below 79˚F/43˚C over set temperature.
Standby Mode
To enter the standby mode:
1. Press the button. The upper platen will lower, and
the grill will maintain a set temperature of Upper platen
- 425˚ F (218˚C), Grill Surface - 350˚ F (177˚C).
To Exit the Standby Mode:
1. Press the GREEN PUSHBUTTON. The upper platen
will raise.
To display the current temperatures:
1. Press the button and repeat for each zone to be
displayed:
1st key press – Front Set Point
2nd key press – Front Actual
3rd key press – Mid Set Point
4th key press – Mid Actual
5th key press – Back Set Point
6th key press – Back Actual
7th key press – Platen Set Point
8th key press – Platen Actual
2. Pressing and holding the button for five (5) seconds
will display all of the current temperatures at once.
Cooking Procedures in MANUAL MODE
Breakfast
1. Select AM mode using the button.
2. Select Manual mode using the button.
3. Select a product from the AM product library using the
or arrow buttons.
4. Following McDonalds procedures for the item selected,
load product on the grill.
5. Press the GREEN pushbutton to initiate a cook cycle.
6. Alarm will sound when the cook cycle is complete.
7. Remove product and clean grill to prepare for the next
cook cycle.
Lunch
Note: Switching from Breakfast to Lunch menu items
will take approximately 10 minutes to heat to the
appropriate temperatures.
1. Select PM mode using the button.
2. Select Manual mode using the button.
3. Select a product from the PM product library using the
or arrow buttons.
4. Following the below lay pattern, load product on the
grill.
5. Press the GREEN pushbutton to initiate a cook cycle.
6. Alarm will sound when the cook cycle is complete
7. Remove product and clean grill to prepare for next
cook cycle.
To Change The Cook Time for a Menu Item
1. Select AM or PM mode using the button.
2. Select Manual mode using the button.
3. Select a product using the or arrow buttons.
4. PRESS the button to display the cook time.
5. Use the and buttons to change the cook time.
6. The control will automatically default back to the
normal operating mode after 3 seconds.
T ### F ###
M ### B ###