


Special offers from our partners!

Find Replacement BBQ Parts for 20,308 Models. Repair your BBQ today.
15
CHIMNEY INSTALLATION
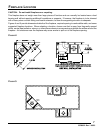
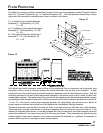
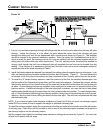
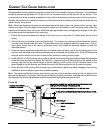
1. Lay out, cut and frame openings through all ceilings and the roof at the point where the chimney will pass
through. Unless the chimney is to be offset, the point where the center line of the chimney will pass
through the ceiling and roof can be determined with a plumb line as shown by Figure 15. The fireplace
should be located in the planned installation position. After the center line is established and a nail is
driven to mark the point, the opening can be cut if you are satisfied with the chimney location relative to
ceiling and roof joists and/or any other obstructions. The roof opening center line should be marked by
driving a nail through the roof from underneath that will penetrate the roof and can be located from the
rooftop. If the chimney is to penetrate a pitched roof, the hole in the roof must be rectangular instead of
square and should be sized according to Table1.
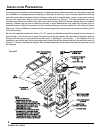
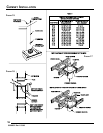
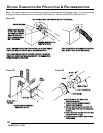
2. Install the firestop spacer as required from beneath the ceiling unless the space above is attic space. In an
attic, the firestop spacer should be installed at the floor level of the attic. Figure 17. You must have joists
or headers on all four sides of the spacer and use a minimum of four 8-penny nails to secure the spacer.
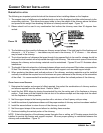
3. To install the “S” series chimney sections, insert the male end of the flue, the smallest diameter pipe, into
the flue outlet of the fireplace and press down until the snap locks engage. Continue the process, adding
the chimney sections on top of each other until the chimney is at least six inches above the roof opening on
all sides. As the chimney sections are installed, check each joint to make sure it is properly locked to the
previous section. If additional strength of the outer pipe joints is desired, you may use two or three sheet
metal screws placed through the area where the outer pipes overlap one another. To install these screws,
drill a 1/8-inch diameter hole through the chimney sections, taking care not to penetrate the inner flue pipe.
Warning: Be very careful when drilling the holes into the outer pipe. The drill must not penetrate the inner
stainless steel pipe.
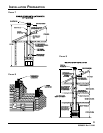
NOTE: If you intend to have a total fireplace installation of more that 30 feet you must use chimney support
model SCS at or below 30 feet to support the weight of additional chimney pipe.
To install the chimney support, place the crimped end of the flue and outlet air duct portions into the last section
of chimney pipe. Push down until the outside or inlet air duct of the chimney support overlaps and snap locks
the chimney support into the chimney section.
Nail the support straps tightly to a building frame member or ceiling joist as shown by Figure 16. You must use
at least two 8-penny nails per strap.
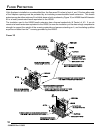
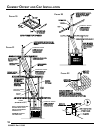
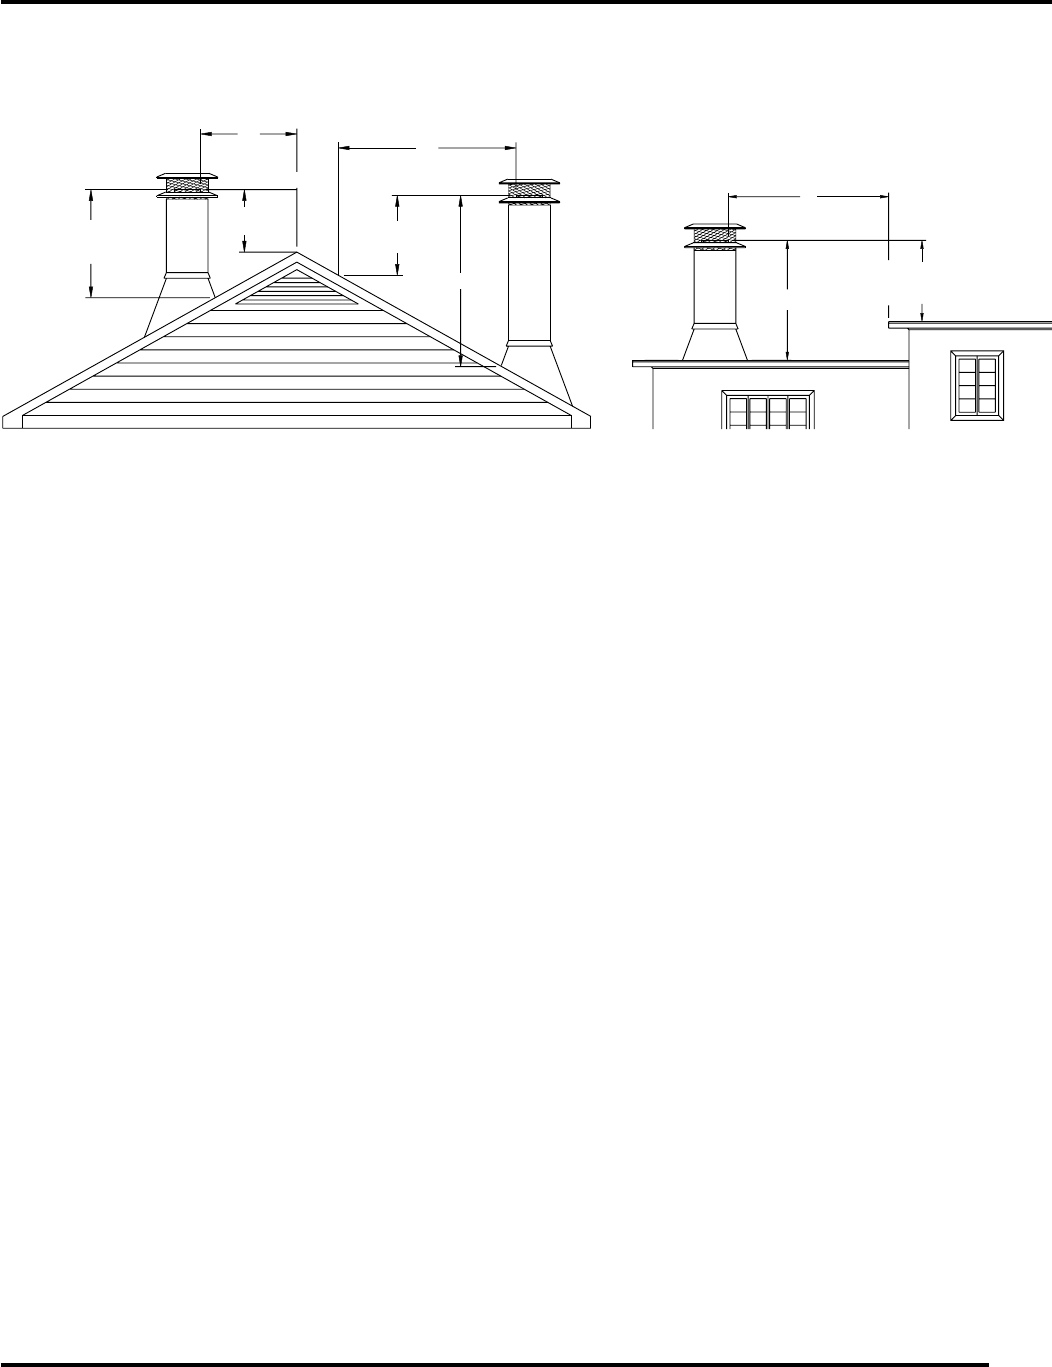
FIGURE 14
"A"
"A"
"A"
"A"
FLUE OUTLET
FLUE OUTLET
HEIGHT
HEIGHT
2" MIN. WHEN
2" MIN. WHEN
DIM."A" IS 10'
DIM."A" IS 10'
OR LESS
OR LESS
NOTE: FLUE OUTLET SHOULD BE TWO FEET ABOVE ALL PORTIONS OF
NOTE: FLUE OUTLET SHOULD BE TWO FEET ABOVE ALL PORTIONS OF
THE BUILDING WITHIN TEN FEET AS SHOWN BY THESE ILLUSTRATIONS.
THE BUILDING WITHIN TEN FEET AS SHOWN BY THESE ILLUSTRATIONS.
THE CHIMNEY MUST NOT EXTEND MORE THAN 90 INCHES ABOVE
THE CHIMNEY MUST NOT EXTEND MORE THAN 90 INCHES ABOVE
THE ROOF WITHOUT ADDITIONAL SUPPORT.
THE ROOF WITHOUT ADDITIONAL SUPPORT.
FLUE OUTLET HEIGHT
FLUE OUTLET HEIGHT
FLUE OUTLET
FLUE OUTLET
HEIGHT
HEIGHT
2" MIN. WHEN
2" MIN. WHEN
DIM."A" IS 10'
DIM."A" IS 10'
3" MIN.
3" MIN.
2" MIN. WHEN
2" MIN. WHEN
DIM."A" IS 10'
DIM."A" IS 10'
2" MIN. WHEN
2" MIN. WHEN
DIM."A" IS 10'
DIM."A" IS 10'
OR LESS
OR LESS
"A"
"A"
3" MIN.
3" MIN.
53D9032. Rev 1 03/03