


Special offers from our partners!

Find Replacement BBQ Parts for 20,308 Models. Repair your BBQ today.

17
Installing the Insert (continued)
NOTE: The damper of the masonry chimney may need to be
removed to allow installation of the flexible-vent pipe.
WARNING: THE SOLID FUEL FIRE-
PLACE HAS BEEN CONVERTED FOR
USE WITH GAS ONLY AND CANNOT BE USED
FOR BURNING WOOD OR SOLID FUELS UN-
LESS ALL ORIGINAL PARTS HAVE BEEN RE-
PLACED AND THE FIREPLACE HAS BEEN
REAPPROVED BY THE AUTHORITY HAVING
JURISDICTION.
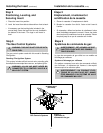
NOTE: The above label, located in the instruction package,
must be affixed to the lower back wall of the existing fireplace
prior to installation of the insert.
For zero clearance, factory built woodburning fireplaces, the
use of kit LINK-ZC-ADP and LINK-ZC-ADPB, in place of the
standard square flashing, will allow you to mount the adaptor
and cap on metal pipe.
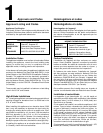
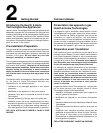
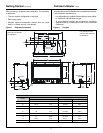
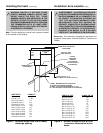
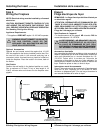
Connecting the Vent Pipe
Install the 3-inch flexible vent pipes down through the chimney.
Remove the starting collar bracket from the top of the unit. See
figure 5. Attach and secure the bottom ends of the flex pipes to
the starting collar bracket with 3 sheetmetal screws on each
collar. Slide the gas insert into place, and position any excess
flex vent pipe back up into the chimney. Re-attach the collar
bracket to the unit with one sheetmetal screw through
the front of the unit.
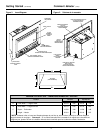
Attach the pipe-to-cap adaptor to the termination cap and
the top of the flexible vent pipe and set the cap in place at
the top of the chimney. See Figures 4, 5 and 6.
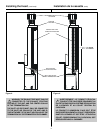
CAUTION: TO AVOID DOWNDRAFTS AND/OR COLD AIR
PROBLEMS, IT IS RECOMMENDED TO SEAL OFF THE
AREA BETWEEN THE TERMINATION CAP AND THE TOP
OF THE SOLID-FUEL CHIMNEY OPENING INTO WHICH
THE VENT CAP HAS BEEN INSTALLED.
WHEN USING THE LINK-DV4-30 VENT SYSTEM, IT IS
REQUIRED TO SEAL AROUND THE FLEXIBLE VENT
PIPES IN THE DAMPER AREA. SEE FIGURE 4. USE
FIBERGLASS INSULATION OR OTHER SUITABLE NON-
COMBUSTIBLE MATERIAL.
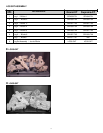
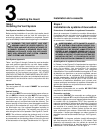
VENT SYSTEM APPROVALS
LINK-DV30, LINK-DV30B,
LINK-DV4-30, LINK-DV4-30B
TABLE 1
Installation de la cassette (suite)
REMARQUE : Il sera peut-être nécessaire de démonter le
registre de la cheminée en maçonnerie pour permettre
l’installation du conduit flexible.
AVERTISSEMENT : LA CHEMINÉE À COMBUS-
TIBLE SOLIDE A ÉTÉ CONVERTIE POUR ÊTRE
UTLISÉE SEULEMENT AVEC DU GAZ ET NE PEUT
PLUS ÊTRE UTILISÉE POUR BRÛLER DU BOIS OU
D’AUTRES COMBUSTIBLES SOLIDES, À MOINS
QUE TOUTES LES PIÈCES D’ORIGINE NE SOIENT
REMISES EN PLACE ET QUE LA CHEMINÉE N’AIT
ÉTÉ À NOUVEAU APPROUVÉE PAR LES AUTORITÉS
COMPÉTENTES.
REMARQUE : L’étiquette ci-dessus, fournie avec le guide
d’utilisation, doit être apposée sur la paroi arrière inférieure du
foyer existant avant l’installation de la cassette.
Sur les cheminées à bois préfabriquées sans dégagement,
l’utilisation du module LINK-ZC-ADP et LINK-ZC-ADPB, au
lieu du solin carré standard, vous permettra de monter le
raccord et le capuchon sur un conduit métallique.
Raccord du conduit d’air
Faites passer les conduits flexibles de 76 mm dans la cheminée.
Retirez le support de collet de raccord du dessus de l’appareil.
Consultez la Figure 5. Fixez l’extrémité inférieure des conduits
flexibles au support de collet de raccord à l’aide de 3 vis à tôle
sur chaque collet. Insérez la cassette et renfoncez toute longueur
excessive de conduit flexible dans la cheminée. Re-fixez le
support de collet sur la façade de l’appareil à l’aide d’une
vis à tôle.
Fixez le raccord conduit/capuchon sur le capuchon et le
haut du conduit flexible, puis mettez le capuchon en place
en haut de la cheminée. Consultez les Figures 4, 5 et 6.
ATTENTION : POUR ÉVITER LES PROBLÈMES DE
REFOULEMENT ET/OU DE COURANTS D’AIR FROID, IL
EST RECOMMANDÉ DE BOUCHER HERMÉTIQUEMENT
L’ESPACE ENTRE LE CAPUCHON ET LE HAUT DE
L’OUVERTURE DE LA CHEMINÉE À COMBUSTIBLE
SOLIDE SUR LAQUELLE LE CAPUCHON A ÉTÉ
INSTALLÉ.
AVEC LE SYSTÈME D’ÉVACUATION LINK-DV4-30, IL EST
OBLIGATOIRE DE BOUCHER HERMÉTIQUEMENT LES
JOINTS DES CONDUITS FLEXIBLES AUTOUR DU
REGISTRE. CONSULTEZ LA FIGURE 4. UTILISEZ DE
L’ISOLANT DE FIBRE DE VERRE OU UN AUTRE
MATÉRIAU NON COMBUSTIBLE ADAPTÉ.
HOMOLOGATION DU SYSTÈME D’ÉVACUATION
LINK-DV30, LINK-DV30B,
LINK-DV4-30, LINK-DV4-30B
TABLEAU 1
!
!