


Special offers from our partners!

Find Replacement BBQ Parts for 20,308 Models. Repair your BBQ today.
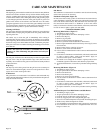
R-3848 Page 7
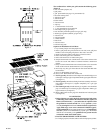
USING YOUR SUPERB GRILL
9. If grill burner does not light, turn all knobs to "OFF" and have a
qualified service technician check grill.
10. Turn all knobs to "OFF" and shut off gas supply when not in use.
If the grill burner will not light after several tries, refer to Troubleshoot-
ing section of this manual.
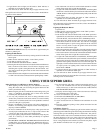
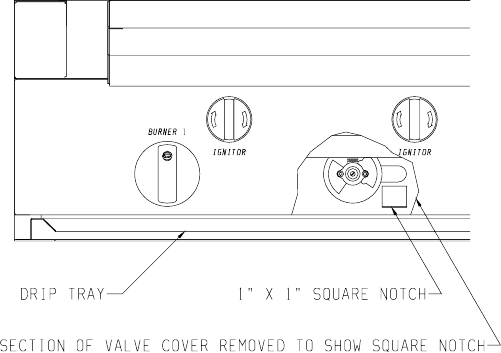
Figure 6
TO PREHEAT GRILL: Once lit, close the lid for approximately 10
minutes to preheat grill.
Lighting the Side Burner
1. Remove the side burner lid and any cooking utensils from the side
burner grate.
2. Make sure the side burner knob is in the "OFF" position.
3. Turn ON gas supply to gas grill.
4. Push and turn the side burner knob to "HIGH."
5. Rotate ignitor knob, between rotisserie burner knob and side burner
knob, clockwise several times. You will hear a snapping sound,
indicating that a spark is being delivered to the side burner. You
may need to rotate the ignitor knob several times before the side
burner lights.
6. If the side burner does not light in 4 seconds turn the side burner knob
to "OFF" and wait at least 5 minutes before repeating Steps 4 and 5.
7. The side burner can also be lit with a match attached to a match
holder if the ignitor fails to light the side burner.
8. To light with a match attached to a match holder, hold the lighted
match next to the side burner ports and turn the side burner knob to
"HIGH." Remove and extinguish the match quickly when the side
burner lights.
9. If side burner does not light, turn knob to "OFF" and have a
qualified service technician check grill.
10. Turn all knobs to "OFF" and shut off gas supply when not in use.
If the side burner will not light after several tries, refer to Troubleshoot-
ing section of this manual.
Lighting the Rotisserie Burner
1. Open the lid.
2. Make sure the rotisserie burner knob is in the "OFF" position.
3. Turn ON gas supply to gas grill.
4. Push and turn the rotisserie burner knob to the LEFT position to
light the left, rotisserie burner. If the right, rotisserie burner is to be
used with the left, rotisserie burner turn to the BOTH position.
5. Rotate the ignitor knob, between rotisserie burner knob and side
burner knob, clockwise several times. You will hear a snapping
sound indicating that a spark is being delivered to the rotisserie
burner. You may need to rotate the ignitor knob several times
before the rotisserie burner lights.
6. If the rotisserie burner does not light in 4 seconds, turn the rotisserie
knob to "OFF" and wait 5 minutes before repeating Steps 4 and 5.
7. The rotisserie burner can also be lit with a match attached to a match
holder if the ignitor fails to light the rotisserie burner.
8. To light with a match attached to a match holder, hold the lighted
match next to the rotisserie burner ports on the left, rotisserie burner
and turn the rotisserie burner knob to LEFT. Remove and extin-
guish the match quickly when the left, rotisserie burner lights. To
light right, rotisserie burner after the left, rotisserie burner has been
lit, repeat process for lighting with a match and turn rotisserie
burner knob to BOTH.
9. If rotisserie burner does not light, turn knob to "OFF" and have a
qualified service technician check grill.
10. Turn all knobs to "OFF" and shut off gas supply when not in use.
If the rotisserie burner will not light after several tries, refer to Trouble-
shooting section of this manual.
Safety Practices to Avoid Injury to Self or Property
1. When lighting a burner always pay close attention to what your
doing. Be certain that you are turning the ignitor labeled for the
burner you intend on using.
2. When using the grill: Do not touch the elevated cooking racks, grill
plates, or immediate surrounding area as these areas become
extremely hot and could cause burns.
3. Use only a dry barbecue mitt, moist or damp potholders on hot
surfaces may cause burns from steam. Do not use a towel or bulky
cloth in place of a barbecue mitt. Do not let potholders touch hot
portions of the grill or grill plates.
4. Grease is flammable. Let hot grease cool before attempting to
handle it. Avoid letting grease deposits collect in the drip pans or
drip trays. CLEAN OFTEN.
5. Do not use aluminum foil to line drip trays or drip pans. This can
severely upset combustion air flow or trap excessive heat in the
control area. The result of this can be melted knobs.
6. For proper lighting and performance of the burners keep the ports
clean. It is necessary to clean them periodically for optimum
performance.
7. NEVER GRILL WITHOUT THE DRIP TRAYS IN PLACE and
pushed all the way to the back of the grill. Without the drip trays,
hot grease could leak downward and produce a fire or explosion
hazard.
8. Do not locate the grill under overhead unprotected surfaces. Use
only in well ventilated areas. Do not use in buildings, garages,
sheds, breezeways, or other such enclosed areas. THIS UNIT IS
FOR OUTDOOR USE ONLY.
9. Keep any electrical supply cord, or the rotisserie motor cord away
from the heated areas of the grill.
10. Never use a dented or rusty LP tank.
11. DO NOT USE CHARCOAL IN THE GRILL.
12. Never place paper inside the grill.
13. Never obstruct the flow of combustion and ventilation air to the
grill.
14. Keep the ventilation opening of the cylinder enclosure free and
clear from debris.
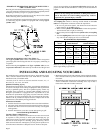
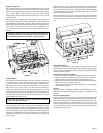
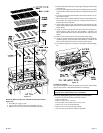
Grill Plates (Figure 7)
An exclusive feature of your Superb gas grill are the stainless steel grill
plates designed to deflect the grease from falling into the burners thereby
reducing flare-ups and extending the life of the burners. The perfora-
tions in the stainless steel evens out the heat and creates a hot surface for
the meat drippings to fall on to. This action turns the drippings into
smoke which passes over the meat resulting in a delicious "charcoal
flavor." The grill plates can be turned over to become sear plates. A grill
plate handle is included to turn over grill plates.