


Special offers from our partners!

Find Replacement BBQ Parts for 20,308 Models. Repair your BBQ today.

Page 6 R-3848
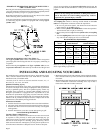
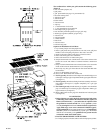
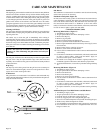
Figure 5
Air Shutter Adjustment
Be careful as the burners may be very HOT! The air shutters are
located behind the valve cover. There is an access area at the
bottom of the valve cover where you can adjust the air shutter,
with your fingers. A yellow flame indicates insufficient air.
Open the air shutter to allow more air to the burner. If flame is
noisy, blows out, or lifts away from burner or will not light, this
indicates too much air. Close the air shutter.
INSTALLATION CHECK LIST
Note to the Installer: Be sure all items on this list have been thoroughly
completed and checked before operating the grill.
1. Specified clearances maintained to combustibles.
2. All internal packaging removed.
3. Knobs turn freely and bezels centered.
4. Each burner lights satisfactorily, individually or with adjacent
burner lit.
5. Air shutter adjusted.
6. Adjustable low setting satisfactory.
7. Drip trays in place properly and sliding freely.
8. Pressure regulator connected and set for 11.0" w.c. for LP gas.
9. Pressure checked and set at 3.5" w.c. for Natural gas.
10. Grill tested and free of gas leaks.
11. User informed of gas supply shut off valve location.
4. For systems other than self-contained LP gas (propane) sys-
tems:
A. The grill and its individual shut-off valve must be discon-
nected from the gas supply piping system during any pressure
testing of that system at test pressures in excess of 1/2 psig
(3.5kPa).
B. The grill must isolated from the gas supply piping system by
closing its own manual shut off valve during any pressure
testing of the gas supply piping system at pressures equal to or
less than 1/2 psig (3.5kPa).
5. After the installation of all gas-related items: i.e. hose, regulator,
LP gas cylinder, natural gas hose or natural gas regulator; the grill
control valves should be turned off and the gas turned on. This is
known as "charging the system." All gas connections must be
checked with a soapy solution while the whole system is under
pressure.
To make a soap solution, mix together an equal amount of liquid
detergent and water.
6. Apply soap mixture to all gas connections. Soap bubbles will
appear if there is a leak. Tighten connections to make a proper seal.
If you cannot stop a gas leak turn off the gas supply and call your
local gas utility, or the dealer from whom the grill was purchased.
Only those parts recommended by the manufacturer should be
used on the Superb gas grill. Substitutions will void the war-
ranty. Do not use the Superb gas grill until all connections have
been checked and do not leak.
A gas system MUST be tested yearly, or whenever the LP gas cylinder
is replaced, or any other gas system part.
ADJUSTING FOR PROPER FLAME AND EFFICIENCY
Air Shutter (Figure 5)
Each burner is tested and adjusted at the factory prior to shipment.
However, variations in the local gas supply may make it necessary to
adjust the burners. The flames of the grill burners should be visually
checked. The rotisserie burners should have a very low flame (no more
than 1/4") and glow with an orange color. There is no air shutter
adjustment for the rotisserie burners. On the main burners and side
burner, the flames should be blue and stable with no, excessive noise or
lifting. If the burners do not operate correctly, check if the air shutter or
burner ports are blocked by dirt, debris, spider webs, etc. and proceed
with air shutter adjustment. The amount of air which is drawn into a
burner is governed by a metal cup at the inlet of the burner called an air
shutter.
WARNING! Before lighting your grill be sure to read this
section carefully.
Turn all knobs to the off position. Inspect the gas supply piping or hose
prior to turning the gas on. If there is evidence of cuts, wear, or abrasion,
it must be replaced prior to use. The replacement pressure regulators and
hose assembly must be the type specified by the manufacturer. Do not
use the Superb gas grill if the odor of gas is present.
For LP gas, the pressure regulator and hose assembly supplied with the
unit must be used. Install the regulator into the tank and check the hose
and regulator connections for leakage with a soap and water solution
before operating your Superb gas grill. Be sure there is gas in the tank.
When lighting your grill always keep your face and body as far
away from the grill as possible.
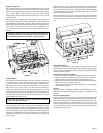
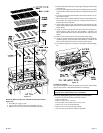
Lighting the Grill Burners (Figure 6)
The gas grill is equipped with (5) grill burners and (5) piezo ignitors for
the grill burners.
HOW TO LIGHT YOUR GAS GRILL
1. Open the lid.
2. Make sure the grill burner knob to be lighted is in the "OFF"
position.
3. Turn ON gas supply to gas grill.
4. Push and turn the grill burner knob to "HIGH."
5. Be certain that you are turning the ignitor for the grill burner you
intend on using. Rotate ignitor knob clockwise several times. You
will hear a snapping sound, indicating that a spark is being deliv-
ered to the burner. You may need to rotate the ignitor knob several
times before the grill burner lights.
6. If the grill burner does not light in 4 seconds, turn the grill burner
knob to "OFF" and wait 5 minutes before repeating Steps 4 and 5.
7. Each grill burner can also be lit with a match attached to a match
holder, if the ignitor fails to light the grill burner.
8. To light with a match attached to a match holder, insert lighted
match below valve cover, adjacent to the grill burner knob and
through the 1" x 1" square notch on front liner. Turn the grill burner
knob to "HIGH." Remove and extinguish the match quickly when
the grill burner lights.