


Special offers from our partners!

Find Replacement BBQ Parts for 20,308 Models. Repair your BBQ today.

Page 12 R-3848
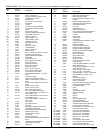
HOW TO ORDER REPAIR PARTS...
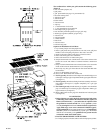
All parts listed in the Parts List have a part No. When ordering parts, first obtain the Model No. from the nameplate on your equipment. Then determine
the Part No. (not the Index No.) and the Description of each part from the appropriate illustration and list. Be sure to give all this information...
Grill Model Number Part Description
Grill Serial Number Type of Gas (Propane or Natural)
Part Number
Do not order bolts, screws, washers or nuts. They are standard hardware items and can be purchased at any local hardware store. Order parts through your
local dealer.
Shipments contingent upon strikes, fires, and all causes beyond our control.
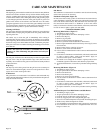
1. Grill won't light when the rotary ignitor is turned.
a. With the gas tuned off, remove the grill plates, ceramic
plaques and plaque rack. Turn the ignitor knob clockwise
to check the spark. You should see a spark jump from tip of
the ignitor. If there is a spark, check the gas supply. Is the
tank full? Is the line purged of air? Can you light the burner
with a match?
b. Check air shutter adjustment, close as needed.
c. Do other burners light?
d. Check the orifice for blockage.
e. Is the ignitor tip clean and free from debris?
f. Clean ignitor tip.
2. Burner flame is yellow or orange and there is a smell of gas.
a. Check the burner inlet for obstructions.
b. Check the air shutter for proper adjustment.
c. Check for spiders, spider webs and debris.
3. Low heat with control knob set on "HI."
a. Is the fuel hose bent or kinked?
b. Is there an adequate gas supply?
TROUBLE-SHOOTING
If your Superb gas grill does not function properly, use the following checklist before contacting your dealer for service.
You may save the cost of a service call.
c. If there is only one burner that appears low, does the orifice
or burner need cleaning?
d. Is the air shutter too far open or closed?
e. Is the gas supply, or gas pressure low?
f. Has the grill been preheated for at least 10 minutes?
4. The smell of gas with flames appearing yellow or the gas grill
does not reach temperature and heats unevenly.
a. Check for spiders or insects.
b. Spiders and insects can nest in the burner of this or any
grill, and cause a disruption in the flow of gas from the
burner. This is dangerous and can cause a fire behind the
valve cover, damaging the grill and making it unsafe to
operate.
You should inspect the burners periodically or immedi-
ately if any of these conditions occur or persist.
5. The burners make popping noises.
a. Check air shutter adjustment.
b. Check burners for clogged ports.
Empire Comfort Systems, Inc. Nine Eighteen Freeburg Ave. Belleville, Illinois 62222-0529
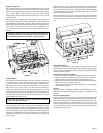
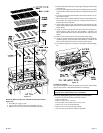
Adjusting Main Burner Electrodes
1. Remove four (4) grill plates.
2. Remove ceramic plaques.
3. Remove plaque rack.
4. Remove five (5) burner hoods from five (5) main burners.
5. Remove five (5) collector boxes from five (5) main burner electrodes,
one (1) 10 - 16 x 1/2" Phillips stainless steel screw for each collector
box.
6. At this time, check for proper sparking of the electrodes. Turn
electrode knob, the spark should occur between the second and third
port hole on main burner.
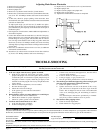
To adjust spark angle you will use two (2) needle nose pliers.
Grasping electrode wire 1/2" back from tip of electrode with first
pair of needle nose pliers adjust tip of electrode with second pair of
needle nose pliers.
7. Check ignition of main burners. Make additional adjustments to
electrodes if required.
8. Locate main burner with electrode that is to the left of chip tray.
Place collector box over electrode. Place flange on collector box
beneath flange on chip tray guide. The clearance hole in collector
box will align with clearance hole in chip tray guide. Insert and
attach one (1) 10-16 x 1/2" Phillips stainless steel screw from Step
5 through chip tray flange and collector box flange and into bottom
of inner liner.
9. Place four (4) additional collector boxes over four (4) additional
main burners with electrodes.
10. Attach four (4) collector boxes to bottom of inner liner with four
(4) 10-16 x 1/2" Phillips stainless steel screws from Step 5.
11. Replace five (5) burner hoods over five (5) main burners.
12. Replace plaque rack.
13. Replace ceramic plaques onto plaque rack.
14. Replace four (4) grill plates.
15. Adjustment of main burner electrodes is completed.