


Special offers from our partners!

Find Replacement BBQ Parts for 20,308 Models. Repair your BBQ today.

4
106516
DIRECT-VENT FIREPLACE (NATURAL/PROPANE/LP)
®
BHDV34NB AND BHDV34PB
Fireplace size D x FW x RW
34" 18
1
/2" 34
3
/8" 14"
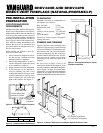
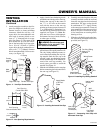
PRE-INSTALLATION
PREPARATION
LOCATION AND SPACE
REQUIREMENTS
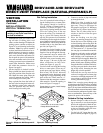
Determine the safest and most efficient loca-
tion for your Vanguard direct-vent fireplace.
Make sure that rafters and wall studs are not
in the way of the venting system. Choose a
location where the heat output is not affected
by drafts, air conditioning ducts, windows or
doors. Figure 2 shows some common loca-
tions. Read all venting information in this
manual. Be aware of all restrictions and
precautions before deciding the exact loca-
tion for your fireplace.
When deciding the location of your fire-
place, follow these rules:
1. Do not connect this fireplace to a chim-
ney flue serving a separate solid-fuel
burning fireplace or appliance.
2. Due to high temperatures, do not lo-
cate this fireplace in high traffic areas
or near furniture or draperies.
3. Proper clearances must be maintained.
4. If your fireplace is to be installed di-
rectly on carpeting, vinyl tile, or any
combustible material other than wood,
it must be installed on a metal or wood
panel extending the full width and
depth of the fireplace. See Figure 3.
34
3
/4"
34
1
/4"
20" Vertical Termination
19" Horizontal Termination
CLEARANCES
Minimum clearances to combustibles for
the fireplace are as follows:
Back, and sides 0"/mm
Perpendicular walls 6" (152mm)
Floor 0"/mm
Ceiling to louver opening 42" (1067mm)
Front 36" (914mm)
Top of Standoffs 0"/mm
See General Venting on page 5 for specific
venting clearances.
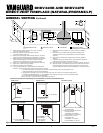
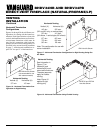
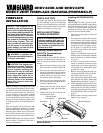
FRAMING AND FINISHING
Figures 4 and 5 show typical framing of this
fireplace. Figure 6 on page 5 shows framing
for corner installation. All minimum clear-
ances must be met. Do not install fireplace
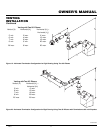
directly on carpeting, vinyl tile, or any com-
bustible material other than wood. The fire-
place must set on a metal or wood panel
extending the full width and depth of the
fireplace.
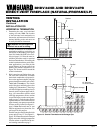
See Accessories on pages 34 and 35 for
mantel kits available for this fireplace. If you
are using a separate combustible mantel piece,
refer to Figure 7 on page 5 for proper instal-
lation height. You can install noncombustible
mantels at any height above the fireplace.
Note:
Noncombustible mantels may discolor!
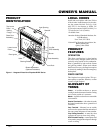
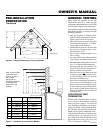
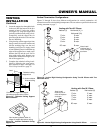
Figure 2 - Common Fireplace Locations
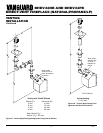
Figure 4 - Framing Clearances for Installation Against an Exterior Wall
Figure 5 - Framing Clearances for Typical
Fireplace Installation
Flush with a wall
Through exterior wall
enclosed in a chase
Corner
installation
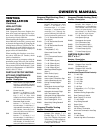
Figure 3 - Fireplace Bottom Dimensions
D
RW
FW
20"
34
"
5/8" for drywall facing
Must maintain a minimum
1" clearance to combustibles