


Special offers from our partners!

Find Replacement BBQ Parts for 20,308 Models. Repair your BBQ today.

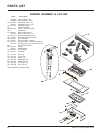
18
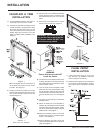
Regency I31-3 Gas Fireplace Inbuilt
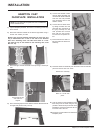
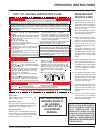
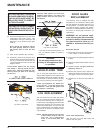
Top View of pilot flame
Correct flame pattern has two strong
blue flames: 1 flowing around the ther-
mopile and 1 reaching towards the rear
burner (it does not have to be touching
the burner).
Top View of pilot flame
Incorrect flame pattern will have small,
probably yellow flames, not coming into
proper contact with the rear burner or
thermopile.
MAINTENANCE
CAUTION: ANY SAFETY SCREEN
OR GUARD REMOVED FOR SERV-
ICING AN APPLIANCE MUST BE
REPLACED PRIOR TO OPERAT-
ING THE APPLIANCE.
CLOTHING OR OTHER FLAMMA-
BLE MATERIAL SHOULD NOT BE
PLACED ON OR NEAR THE APPLI-
ANCE.
6) Each time the appliance is lit, it may cause
condensation and fog the glass. This
condensation and fog is normal and will
disappear in a few minutes as the glass
heats up.
Never operate the appliance without
the glass properly secured in place,
with broken glass or with the door
open.
7) Verify proper operation after servicing.
8) Periodically check the pilot flames, there
should be three strong blue flames approx.
3/4" long - 1 flame to the front burner, and
1 to the thermopile and one to the left. See
diagrams below.
WARNING
Do not spray aerosols in the
vicinity of this appliance while
in operation.
If you have an incorrect flame pattern, con-
tact your Regency dealer for further in-
structions.
GOLD-PLATED TRIM
The 24 carat gold plated finish on the trim
requires little maintenance, and need only be
cleaned with a damp cloth. DO NOT use abra-
sive materials or chemical cleaners, as they
may harm the finish and void the warranty.
Clean any fingerprints off before turn-
ing the unit on. If the top louvres start
to discolour, check the door gasket seal
and replace if necessary.
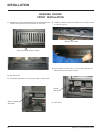
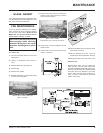
LOG REPLACEMENT
The unit should never be used with broken
logs. Turn off the gas valve and allow the unit
to cool before opening door to carefully re-
move the logs. The pilot light generates enough
heat to burn someone. If for any reason a log
should need replacement, you must use the
proper replacement log. The position of these
logs must be as shown in the diagram under
Log Installation.
NOTE: Improper positioning of logs may
create carbon build-up and will
alter the unit’s performance
which is not covered under war-
ranty.
DOOR GLASS
REPLACEMENT
Your Regency stove is supplied with high
temperature, 5 mm Neoceram ceramic glass
that will withstand the highest heat that your
unit will produce. In the event that you break
your glass by impact, purchase your replace-
ment from an authorised Regency dealer only,
and follow our step-by-step instructions for
replacement.
WARNING: do not operate appli-
ance with the glass front removed,
cracked or broken. Replacement of
the glass should be done by a li-
censed or authorised service per-
son.
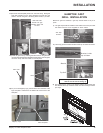
Bay Glass Removal
1) Remove the door from the unit and place on
a soft surface to prevent scratching.
2) Remove the nuts holding the glass retainers
in place.
3) Remove the glass retainers (sides, top and
bottom).
4) Replace the glass. The glass must have
gasketing around it.
5) Reverse the previous steps, replace the
retainers and fasten with the nuts but do not
over tighten, as this can break the glass.
6) Replace door on the stove and check the
seal.
Flush Glass Replacement
Slide old glass out of the side frames and
replace with new glass.