


Special offers from our partners!

Find Replacement BBQ Parts for 20,308 Models. Repair your BBQ today.
NOTE: Using the Most Often interval provides the most
track detail, but fills up the device memory quicker.
• If you selected Distance or Time for the Record Method,
enter a value, and select .
As you move with the device turned on, a track log is created.
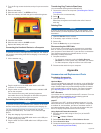
Viewing Details about the Track
1
Select > Track Manager.
2
Select a track.
3
Select View Map.
The beginning and the end of the track are marked by flags.
4
Select the information bar along the top of the screen.
Information about the track is listed.
Viewing the Elevation Plot of a Track
1
Select > Track Manager.
2
Select a track.
3
Select Elevation Plot.
Navigating to the Start of a Track
You can navigate back to the beginning of a track. This can be
helpful when finding your way back to camp or the trail head.
1
Select > Track Manager > Current Track > View Map.
2
Select TracBack.
The map page opens with your route marked with a magenta
line.
3
Navigate using the map (Map) or the compass (Navigating
with the Bearing Pointer).
Changing the Track Color
1
Select > Track Manager.
2
Select a track.
3
Select Set Color.
4
Select a color.
Saving the Current Track
1
Select > Track Manager.
2
Select a track.
3
Select an option:
• To save the entire track, select Save Track.
• To save part of the track, select Save Portion, and select
the part to save.
Saving a Location on a Track
1
Select > Track Manager.
2
Select a track.
3
Select View Map.
4
Select a location along the track.
5
Select the information bar along the top of the screen.
6
Select .
7
Select OK.
Clearing the Current Track
Select > Track Manager > Current Track > Clear
Current Track.
Deleting a Track
1
Select > Track Manager.
2
Select a track.
3
Select Delete > Yes.
Archiving a Saved Track
You can archive saved tracks to save memory space.
1
Select > Track Manager.
2
Select a saved track.
3
Select Archive.
Archiving Tracks Automatically
1
Select Setup > Tracks > Auto Archive.
2
Select an option.
Sending and Receiving Data Wirelessly
Before you can share data wirelessly, you must be within
10 feet (3 m) of a compatible Garmin device.
You can share waypoints, geocaches, routes, and tracks
wirelessly.
1
Select > Share Wirelessly.
2
Select Send or Receive.
3
Follow the on-screen instructions.
Navigation
You can navigate routes and tracks, to a waypoint, geocache,
photo, or any saved location in the device. You can use the map
or the compass to navigate to your destination.
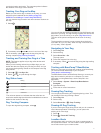
Map
represents your location on the map. As you travel, the icon
moves and leaves a track log (trail). Waypoint names and
symbols appear on the map. When you are navigating to a
destination, your route is marked with a magenta line on the
map.
When the map orientation is Track Up, objects on the map
appear to rotate around your position. As you travel, the entire
map reorients in the direction you are facing. You can stabilize
the objects by setting the orientation to North Up (Map
Settings).
To open the map, select .
Measuring Distance on the Map
You can measure the distance between two points.
1
From the map, select a location.
2
Select > Measure Distance > Use.
3
Move the pin to another location on the map.
Compass
The handheld device has a 3-axis, tilt-compensated compass.
You can use a bearing pointer or a course pointer to navigate to
your destination.
Calibrating the Compass
NOTICE
Calibrate the electronic compass outdoors. To improve heading
accuracy, do not stand near objects that influence magnetic
fields, such as vehicles, buildings, and overhead power lines.
You should calibrate the compass after moving long distances,
experiencing temperature changes, or removing the battery.
1
Select > Compass > > Calibrate Compass > Start.
2
Follow the on-screen instructions.
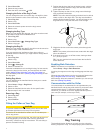
Navigating with the Bearing Pointer
When navigating to a destination, points to your destination,
regardless of the direction you are moving.
1
While navigating to a destination, select > Compass.
2
Turn until points toward the top of the compass, and
continue moving in that direction to the destination.
10 Navigation