


Special offers from our partners!

Find Replacement BBQ Parts for 20,308 Models. Repair your BBQ today.

Installation / Assembly
2007 Barbecue Grill and Cart Owner’s Manual Page 13
LTR20071038, Rev. B
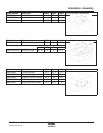
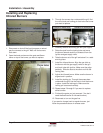
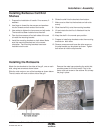
Installing Barbecue Cart End
Shelves
Prepare the installation of handle: 2 hex screws, 2
washers
Use nger to thread the hex screws and washers
into the threads on both ends of the handle.
Use ratchet to tighten the hex screws on both ends.
The handle has been installed onto the shelf.
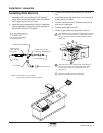
Take the three screws off on both sides of the cart
to install the mounting bracket.
Install the mounting brackets on both sides. Make
sure the mounting brackets are in the correct
orientation. Two mounting brackets have been
installed onto the cart.
1.
2.
3.
4.
5.
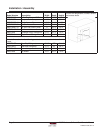
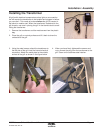
Slides the shelf into the brackets from bottom.
Make sure to slide into the brackets on both side
evenly.
Slide the shelf fully onto the mounting brackets.
Lift and rotate the shelf so it slide back into the
brackets.
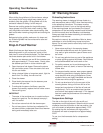
Keep the shelf in the normal open position.
Prepare to install stop brackets under the mounting
brackets on both sides.
Remove one screw and loose the other screw so
the stop bracket can be placed as shown. Tighten
both screw to hold the stop bracket.
6.
7.
8.
9.
10.
11.
12.
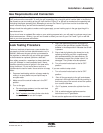
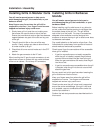
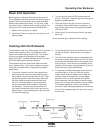
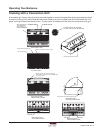
Installing the Rotisserie
Attach the two brackets to the sides of the grill, one on each
side, using two screws as shown below.
Slide the rotis motor on one of the brackets as shown below.
The rotis motor will work on either side of the grill.
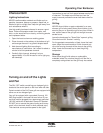
Remove the metal cap protecting the outlet that
provides power for the rotis motor. Plug in the
motor cord and screw on the retainer nut to keep
the plug in place.