


Special offers from our partners!

Find Replacement BBQ Parts for 20,308 Models. Repair your BBQ today.

Installation / Assembly
2007 Barbecue Grill and Cart Owner’s Manual Page 9
LTR20071038, Rev. B
Natural Gas
Requirements
Always check the rating plate to make sure the gas
supply you are hooking up to is the gas type the grill is
manufactured for.
IMPORTANT: Never connect the grill to an unregulated
gas supply.
The installation of this appliance must conform with
local codes or, in the absence of local codes, to the
national fuel gas code, ANSI Z223.1a-1998. Installation
in Canada must be in accordance with the standard
CAN/CGA-B149.2, Propane Installation Code.
A licensed contractor or local gas company
representative must perform all natural gas
connections.
Ensure that the service supplying the grill is tted with a
shut off valve conveniently positioned near the grill and
giving ease of access.
The grill must be isolated from the gas supply piping
system by closing its individual manual shutoff valve
during any pressure testing of the gas supply piping
system at test pressures equal to or less than 0.5 psi
(3.5 kPa).
The grill and its individual shutoff valve must be
disconnected from the gas supply piping system during
any pressure testing of that system at test pressure in
excess of 0.5 psi (3.5 kPa).
Your Cal Flame™ grill for use with natural gas comes
equipped with its own regulator that MUST NOT
be removed. If, this regulator needs to be replaced
use only the type specied by Cal Flame™ for this
appliance.
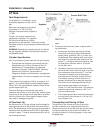
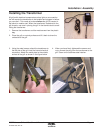
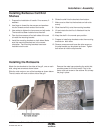
Connection
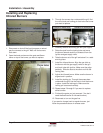
Remove the rear panel from the barbecue to gain
access to the regulator and gas connection point.
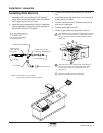
Connect a suitable ex connector to the grill
regulator.
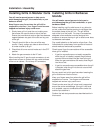
Check the grill controls to ensure all control valves
are in the full OFF position.
Turn on the main gas supply and check all
connections for leaks using soapy water as
described in the leak testing procedure section.
Warning: If you see bubbles in the soapy solution at
any of the connections, turn off the gas supply and
tighten the connection. If tightening the connection
does not seal the leak, it may be necessary to replace
the ex hose.
1.
2.
3.
4.