


Special offers from our partners!

Find Replacement BBQ Parts for 20,308 Models. Repair your BBQ today.

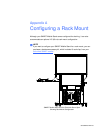
74 | CONFIGURING A RACK MOUNT
99-00962-20 REV C0
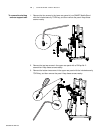
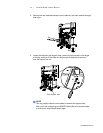
5. Repeat steps 3 and 4 for the right rack rail, except rotate the rail
counter-clockwise before inserting it into the rack mount slots.
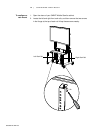
6. Secure each set of four rack mount clips (included in your rack mount hardware
accessory kit) at the desired height for each rack.
NOTE
Install a SMART Hub SE240 in the second highest rack mount position.
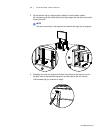
To replace the rear
access panels
1. Replace the upper rear panel that you removed from your SMART Mobile Stand,
secure the bottom two screws with the included security TORX key, and then
secure the top two screws with a Phillips No. 2 screwdriver.
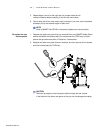
2. Replace the lower rear panel that you removed, and then secure all four screws
with the included security TORX key.
CAUTION
Take care to properly route the power cables through the two cutouts
in the bottom of the lower rear panel so that you do not damage the cables.
A
B