


Special offers from our partners!

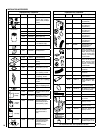
Find Replacement BBQ Parts for 20,308 Models. Repair your BBQ today.

27
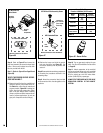
NOTE: DIAGRAMS & ILLUSTRATIONS ARE NOT TO SCALE.
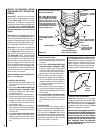
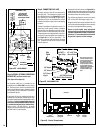
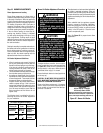
1. Place the rear log (A) as shown in Figure 44. Position the 2 holes
on the bottom of the log over the corresponding locating pins (#1 &
#2) and against the log support bracket. See Figures 43 and 44 for
pin and rear bracket locations.
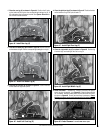
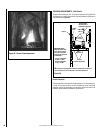
2. Place the left middle log (B) as shown in Figure 45. Position the hole
on the bottom of log B over the corresponding locating pin on Log A.
5. Place the right middle log (C) as shown in Figure 48
. Position log
C behind Log E and resting on the "flat" on Log A.
3. Place the left front log (D) as shown in Figure 46
. Position the hole
on the bottom of log D over pin# 3.
4. Place the right front log (E) as shown in Figure 47
. Position the hole
on the bottom of log E over pins #4 and # 5.
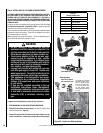
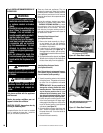
6. Ember Placement - Separate the Embers (rockwool) into pieces
about the size of a quarter (see Figure 43). Keep the pieces fluffed
up, not matted. Distribute these pieces over the surface of the burner,
as shown in Figure 49. Do not use more than is necessary. Ensure
that the main burner ports remain uncovered by the ember material
(see Figure 43).
A
Figure 44 - Install Rear Log (A)
B
A
Figure 45 - Install Left Middle Log (B)
Figure 48 - Install Right Middle Log (C)
Figure 46 - Install Left Front Log (D)
Figure 47 - Install Right Front Log (E)
1
2
Figure 49 - Ember Placement
DO NOT place ember material directly
over the ember burner ports.
3
4
5
D
3
D
C
E
A
E