


Special offers from our partners!

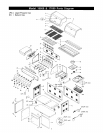
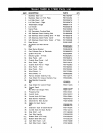
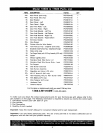
Find Replacement BBQ Parts for 20,308 Models. Repair your BBQ today.

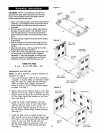
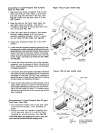
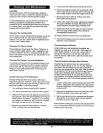
Fuel Gauge Display Installation. Figure 14a
IMPORTANT: Before installingbatteries be sure the
gas tank is not mounted in the tank pull-outtray.
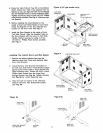
1.Open thefront DoorsofCabinet. Pullout the LPGTank
Pull-out Tray. Connect the Wire Plug "A" from Fuel
Gauge Display with the Wire Plug "B" from rear of Tank
Pull-out Tray. Unscrew 1/4" x 1/2" Phillips head Screw
from Rear Panel and install Wire Fastener to Rear
Panel. Tighten securely using the same screw. See
Fig.14a
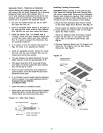
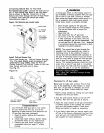
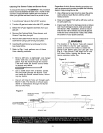
2. From the underside of the Control Panel, unscrew the
Fuel Gauge Display Cover on the Fuel Gauge Display
Box. See Fig.14b
3. Carefully remove the battery box from the back ofthe
Fuel Gauge Display Box and insert two "AAA" batter-
ies (provided). Be sure to follow correct polaritywhen
inserting batteries.
4. Return the Battery Box with electdc wire into the Fuel
Gauge Display Box.
5. Screw the Fuel Gauge Display Cover onto the Fuel
Gauge Display Box.
TANK PULL-OUT
TRAY
REAR PANEL
\
CARTSIDE
PANEL-RIGHT
WIRE
FASTENER
WIRE PLUG "A"
FUELGAUGE
DISPLAY
WIRE PLUG "A"
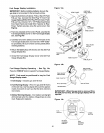
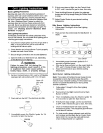
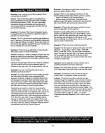
Fuel Gauge Display Operating - See Fig. 14c
Press the "CHECK" button tooperateFuel Gauge Display.
NOTE: Tank must be positioned in tray for Fuel
Gauge Display check
1.Fuel Display: Indicates gas tank fill level
2.Fuel Warning Display: When the gas tank fill level is
on the last row a warning signal will sound for approxi-
mately 3 seconds to warn you that the tank volume is
near empty.
3.Battery Waming Display: A low battery warning light
will illuminate when the battery voltage drops to a low
level. Replace the batteries.
Figure 14b
FUEL GAUGE
DISPLAY COVER
DISPLAY BOX
WIRE
BATTERY BOX
AAABATTERY
IMPORTANT: When the gas tank is removed from
the tank pull-out tray, thefuel gauge display will not
operate.
15
Figure 14c
FUEL --y_
DISPLA
_OR
BATTERY
FUEL
WARNrNG
WARNING
DISPLAY
DISPLAY
CHECK / _CHECK
BUTTON
Y