


Special offers from our partners!

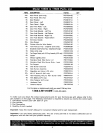
Find Replacement BBQ Parts for 20,308 Models. Repair your BBQ today.

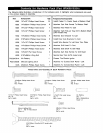
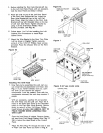
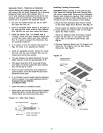
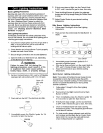
Installing Manual Lighting Stick
.
Attach the Manual Lighting Stick to the Left
Bowl Support Bracket as shown in Fig. 9.
Align the hole at the end of Manual Lighting
Stick Wire with the threaded hole on the Left
Bowl Support Bracket, Tighten securely using
the M4x8mm Phillips Head Screw.
Figure 9
OUTSIDE BOWL
PANEL-LEFT
M4x8rnm PHILLIPS
HEAD SCREW _
MANUAL LIGHTING
STICK
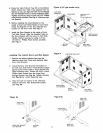
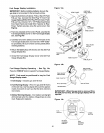
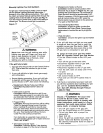
Installing Side Shelf and Cart Side Handle
1. Remove the white protective film from the
stain)ess steel Side Shelf.
2. Enlisting the aid of an assistant, attach Side
Shelf to left side of grill. Align the holes on Side
Shelf with the threaded hores on left Outside Bowl
Panel. Tighten securely using 4 of the
1/4"x3/4" Phillips Screws provided.See Fig. 10.
3. Enlisting the aid of an assistant, attach Cart Side
Handle to right side of grill. Align the holes on
Cart Side Handle with the threaded holes on
right Outside Bowl Panel. Tighten securely using
4 of the 1/4"x3/4" Flat Head Screws provided.
See Fig. 10.
Figure 10
SIDE SHELF+LEFT
GRILL HEAD
OUTSIDE BOWL
PANEL-RIGHT
CART SIDE
HANDLE
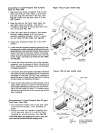
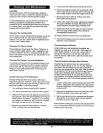
Ignitor Battery Installation - See Fig. 11
1. Unscrew the Ignitor Cap located on the grill
Control Panel and remove the Contact and
Spring from the Ignitor Slot.
2. Place the manufacturer supplied AA battery
into the Ignitor Slot. Be sure to place the
positive pole facing toward you. See Fig. 11
3. Place the Spring over the AA battery, then
prace the Contact on top of the Spring. Screw
the Ignitor Cap back onto the grill Control
Panel.
4. Remove any protective film from outside and
inside of Grill Head.
IMPORTANT: Before use of this grill please
refer to Cleaning Exterior Stainless Steel
Surfaces found on page 20 of this Owner's
Manual,
Figure 11
i IGNITOR SLOT
13
//
IGNITOR CAP
BATTERY
RING
CONTACT