


Special offers from our partners!

Find Replacement BBQ Parts for 20,308 Models. Repair your BBQ today.

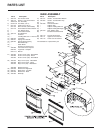
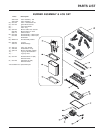
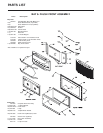
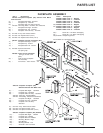
21U32-2 FPI Direct Vent Gas Insert
MAINTENANCE
VALVE REPLACEMENT
1) Shut off the gas supply.
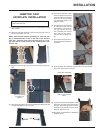
2) Remove the louvers (and bay door if it is on).
3) Open the flush door and remove the door.
4) Remove the logs and brick panels.
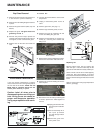
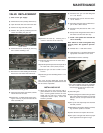
5) Remove the grate by loosening the two
screws and sliding the grate out.
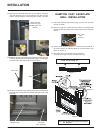
10)Remove the valve by removing the 3
screws in the base of the valve tray.
Grate screws
6) Remove the burner assembly by removing
the 2 screws and lifting it out.
7) Remove the 2 screws holding the Air Intake
Hood to the rear firebox wall and lift out.
8) Disconnect the inlet gas line.
9) Disconnect the TP wire, the TH wire, and the
TH/TP wire from the valve.
10)Remove the 11 Phillips head screws secur-
ing the valve tray in place and then lift the
entire assembly out.
2) Reconnect the "gas out" flare fitting with
an 11/16" wrench.
3) Reconnect the "gas out" flare nut with a .
13/16" wrench.
4) Reconnect the quick drop out thermocou-
ple nut with a 9mm wrench.
5) Reconnect the pilot tube nut with a 7/16"
wrench.
6) Scrape off the old gasket from the floor of
the firebox and from the valve tray.
7) Install a new gasket and reinstall the
valve assembly.
Note: Failure to install a new gasket may
severely affect the appliance perform-
ance.
8) Reinstall the 11 hold down screws.
9) Hook up the TP, TH, and TP/TH wires to the
appropriate connections on the valve.
10)Reinstall the burner assembly.
Note: when installing the burner assembly
be sure to slide the aeration adjustment
wire through the hole in the base of the
burner tray.
11)Install the grate.
12)Hook up the gas line and check for gas leaks
with a soap and water solution or a gas leak
detector. (Do not use open flame for leak
testing.)
13)Fire up the unit temporarily and check the
manifold pressure.
14)Reinstall the vermiculite, embers, rockwool,
logs and brick panels as needed.
15)Close the door and replace the louvers.
16)Fire up the unit again and check for proper
flame appearance and glow on logs.
11)Undo the pilot tube from the valve with a
7/16" wrench.
12)Undo the quick drop out thermocouple nut on
the valve with a 9mm (metric) wrench.
13)Undo the "gas out" flare nut with a 13/16"
wrench.
14)Undo the "gas out" flare fitting with an 11/16"
wrench.
Hint: If you are using black pipe, ensure that
there is a union by the valve, otherwise removal
will be almost impossible.
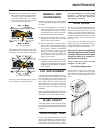
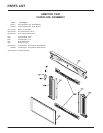
INSTALLING VALVE
1) Attach the valve to the valve tray with a
gasket between the valve and heat shield
and a second gasket between the heat
shield and the valve tray. Fasten these
components with the 3 (#10) screws and
washers provided.
GasketGasketHeat
Shield