


Special offers from our partners!

Find Replacement BBQ Parts for 20,308 Models. Repair your BBQ today.
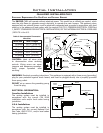
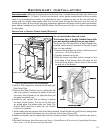
Secondary Installation
Important note: When the unit is turned on for the rst time, it should be turned onto high without the
fan on for the rst four (4) hours. This will cure the paint, rockss, gasket material and the other products
used in the manufacturing process. It is advisable to open a window or door, as the unit will start to
smoke and can irritate some people. After the unit has gone through the rst burn turn the unit off
including the pilot, let the unit get cold then remove the glass door and clean it with a good gas replace
glass cleaner, available at your local ENVIRO dealer. See MAINTENANCE AND SERVICE on how to remove door
to clean glass.
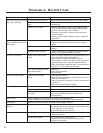
INSTALLATION OF CERAMIC FIREBOX LINER (OPTIONAL):
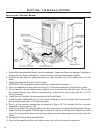
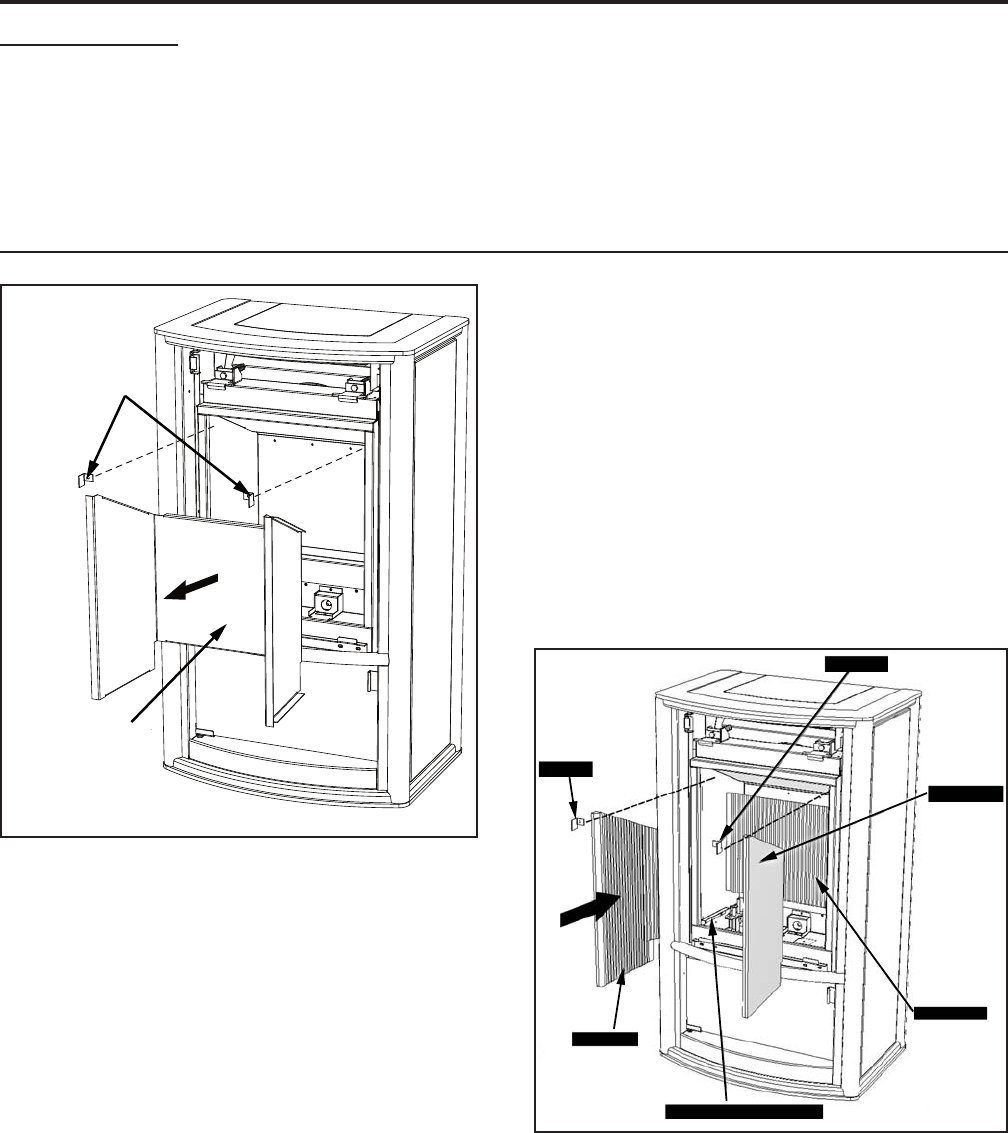
Figure 49: Steel Firebox Liners Installation.
Figure 50: Firebox Liners Installation.
Do not install when the unit is hot.
The rebox liner is fragile. Handle liners with
care and avoid knocking them on any object.
The Enviro Cara DR comes with a Steel Firebox Liner
installed, which must be removed if a Ceramic Firebox
Liner is to be installed.
1. Remove the glass door as shown in the MAINTENANCE
AND SERVICE - GLASS DOOR REMOVAL.
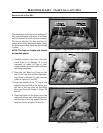
2. Carefully remove the log set.
3. Slide the burner tray back just far enough so the
front edge of the burner does not catch on the
front lip of the rebox. Lift the front of the burner
up and out of the rebox.
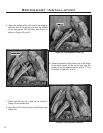
Left Clip
Right Clip
Right Panel
Rear Panel
Left Brick Panel Support
Left Panel
Steel Firebox Liner
Brick Panel Clip
4. Using a T-20 screwdriver, remove the left and right
Brick Panel Clips
5. Remove the Steel Firebox Liner by pulling the left
side of the panel in towards the center of the unit
then out a little. Repeat for the right side then pull
the panel completely out.
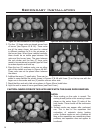
6. Install the rear ceramic liner by placing it against
the back of the rebox. The top of the liner has
an angled edge, the bottom does not. Note: The
Firebox Bafe must be in place for the Firebox
Liners to be installed.
29
7. While holding the rear ceramic liner from falling forward, install the left and right liners by sliding them
in against the sides of the rebox and up to the rear liner (refer to Figure 50).
8. Attach and tighten the brick panel clips with the screws provided. The side liners hold the rear liner in
place.
9. Re-install the burner (see MAINTENANCE AND SERVICE - BURNER REMOVAL & INSTALLATION), log set (see SECONDARY
INSTALLATION - LOG SET INSTALLATION), and the door.