


Special offers from our partners!

Find Replacement BBQ Parts for 20,308 Models. Repair your BBQ today.

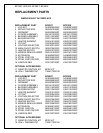
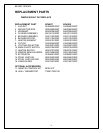
13
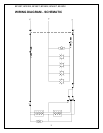
BF33ST, BF33DX, BF39ST, BF39DX, BF45ST, BF45DX
If the fireplace was operating prior to servicing allow at least 10 minutes for light bulbs
and heating elements to cool off to avoid accidental burning of skin.
Disconnect circuit power before attempting any maintenance or cleaning to reduce the
risk of electric shock or damage to persons.
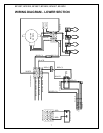
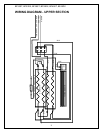
TO REPLACE FLAME MOTOR/FLAME ROD
1. Open the steel curtains (remove glass doors if applicable).
2. Remove the log grate retaining screws and remove the log grate.
3. Pull the rear edge of the log set forward by grasping the ember bed by the sides
(handle the log set only by the ember bed and not the logs) and pulling firmly
until the rear tab pops out from under the back ledge, then lift out.
4. Remove all lower light bulbs.
5. Remove the retaining screws on the light assembly retaining plate and set aside
retaining plate.
6. Reach hand into the opening created by removing the light assembly retaining
plate and locate the flame assembly mounting bracket screw.
NOTE:
Flame assembly bracket screw is secured to flame panel on the same side as the
manual control switches.
7. Remove the flame assembly mounting bracket screw using a ¼” hex head
wrench or socket.
8. Remove the flame rod from the flame assembly by pulling the rubber channel
section of the rod away from the flame motor.
9. Rotate the flame assembly down releasing the mounting tab from the rear panel.
NOTE:
In order for the mounting tab to release from the rear panel, the flame assembly
mounting bracket needs to be rotated a complete 90° down. Cutting of the wire tie
wraps may be required to move wires out of the way.
10. Disconnect the wiring connections noting their original locations.
11. Reassemble in the reverse order as above.
NOTE:
Ensure to secure the flame rod to the end of the flame motor prior to securing flame
motor assembly bracket to flame panel.