


Special offers from our partners!

Find Replacement BBQ Parts for 20,308 Models. Repair your BBQ today.
www.desatech.com
113134-01B 23
Note: You may be running this heater for
the first time after connecting to gas supply
or at the start of your heating season. If so,
the ON button may need to be pressed again.
This will allow air to bleed from gas system.
If several attempts to light pilot fail, contact
a qualified service person or gas supplier
for repairs. Until repairs are made, light
and operate manually (see Manual Lighting
Instructions for Electrical Power Outage).
4. When pilot flame is lit, the thermocouple is
heated by the flame. When thermocouple
becomes hot (5 to 15 seconds), main burner
will automatically light on high flame.
5. To lower flame, point remote control
toward lower front of fireplace and push
HI/LO button once.
Note: This fireplace does not have a pilot-
only mode.
TO TURN OFF GAS
TO APPLIANCE
Shutting Off Heater - Wall Switch
Push ON/OFF button on wall switch once.
Shutting Off Heater - Wireless Remote
Control
Point remote control toward lower front of fire-
place and push both buttons at the same time.
MANUAL LIGHTING
INSTRUCTIONS FOR
ELECTRICAL
POWER OUTAGE
WARNING: You must oper-
ate this heater with the fireplace
screen in place. Make sure fire
-
place screen is in place before
running heater.
NOTICE: During initial operation
of new heater, burning logs will
give off a paper-burning smell.
Open damper or window to vent
smell. This will only last a few
hours.
OPERATING FIREPLACE
Continued
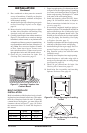
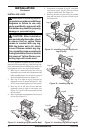
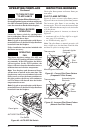
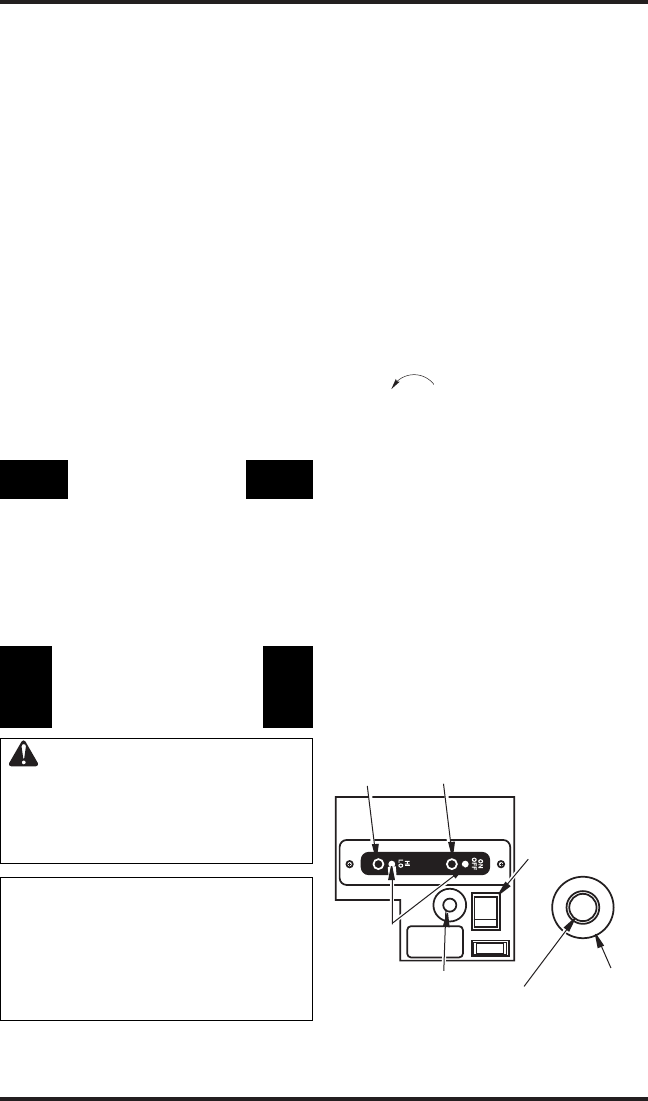
HI/LO
Button
Piezo Ignitor
Wall
Switch
LED
Figure 39 - Control Locations
Manual Ignition
Bypass Switch
(Down is ON)
ON/OFF
Button
Magnetic Manual
Override Handle
Gas Valve
Because this fireplace has an electronic ignition
system, in the event there is a loss of power, it
will be necessary to manually light the pilot with
the piezo ignitor. After the pilot is lit, the main
burner will light automatically.
1. Follow steps 1 through 3 under Normal
Lighting Instructions, page 22.
2. Set manual ignition bypass switch on con
-
trol panel to ON position (manual ignition
position). See Figure 39.
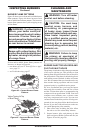
3. The pilot is attached to the rear of the front
burner. You will be able to see the pilot
and spark electrode without removing the
screen or logs.
4. Place the magnetic manual override handle,
provided with this unit, on the end of the
gas valve stem (see Figure 39).
5. Turn the override handle fully counterclock
-
wise to the PILOT position. The handle
will not stop but will begin to slip when you
have fully turned to the PILOT position.
6. While holding the valve handle in the
PILOT position, press and release piezo
ignitor button (see Figure 39). This will light
the pilot. If needed, keep pressing ignitor
button until pilot lights.
7. When pilot flame is lit, hold manual over
-
ride handle until thermocouple heats (ap
-
proximately 5 to 15 seconds). If pilot goes
out, repeat process. If several attempts
to light the pilot fail, contact a qualified
service person or gas supplier for repairs.
8. When thermocouple is heated, release
override handle. The main burner will im
-
mediately light on high flame. Adjust flame
size by turning override handle.