


Special offers from our partners!

Find Replacement BBQ Parts for 20,308 Models. Repair your BBQ today.

www.desatech.com
111244-01C
17
INSTALLATION
Continued
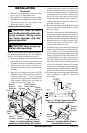
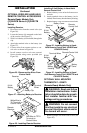
We recommend that you install a sediment trap in
supply line as shown in Figure 20, page 16. Lo-
cate sediment trap where it is within reach for
cleaning. Install in piping system between fuel
supply and heater. Locate sediment trap where
trapped matter is not likely to freeze. A sediment
trap traps moisture and contaminants. This keeps
them from going into fireplace controls. If sedi-
ment trap is not installed or is installed wrong,
fireplace may not run properly.
CONNECTING EQUIPMENT
SHUTOFF VALVE TO HEATER
CONTROL
Installation Items Needed
• Phillips screwdriver
• sealant (resistant to propane/LP gas, not pro-
vided)
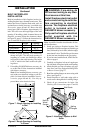
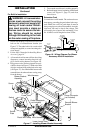
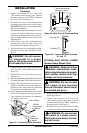
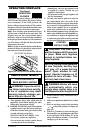
1. Open lower louver (see Figure 21).
NOTICE: Most building codes do
not permit concealed gas con-
nections. A flexible gas line is
provided to allow accessibility
from the fireplace (see Figure 21).
The flexible gas supply line con-
nection to the equipment shutoff
valve should be accessible.
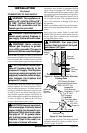
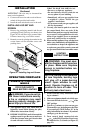
2. Route flexible gas line, included, from fire-
place control to equipment shutoff valve
through side access holes in outer casing.
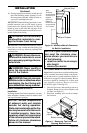
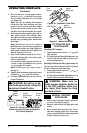
3. Apply pipe joint sealant lightly to male threads
of gas connector attached to flexible gas line/
equipment shutoff valve (see Figure 22).
CAUTION: Avoid damage to
regulator. Hold gas regulator with
wrench when connecting it to
gas piping and/or fittings (Ther-
mostat-Controlled Models Only).
CAUTION: Avoid damage to
gas control. Hold gas control
with wrench when connecting it
to gas piping and/or fittings (Re-
mote-Ready Models Only).
Figure 21 - Flexible Gas Line Location
(Remote-Ready Unit Shown)
O
F
F
P
I
L
O
T
O
N
H
I
L
O
Lower
Louver
Flexible Gas
Line
Figure 22 - Attaching Flexible Gas Line
to Equipment Shutoff Valve
Flexible Gas Line
from Fireplace
Gas Regulator
Provided With
Fireplace
To Gas Regulator (Thermostat-
Controlled Models) or Control
Valve (Remote-Ready Models)
Equipment
Shutoff
Valve
PROPANE/LP
To External Regulator
NATURAL GAS
To Gas Supply
➞
➞
CHECKING GAS CONNECTIONS
WARNING: Test all gas pip-
ing and connections, internal
and external to unit, for leaks
after installing or servicing. Cor-
rect all leaks at once.
WARNING: Never use an
open flame to check for a leak.
Apply a noncorrosive leak de-
tection fluid to all joints. Bubbles
forming show a leak. Correct all
leaks at once.
4. Check all gas connections for leaks. See
Checking Gas Connections, below. Feed flex-
ible gas line into fireplace. Make sure the en-
tire flexible gas line is in fireplace.