


Special offers from our partners!

Find Replacement BBQ Parts for 20,308 Models. Repair your BBQ today.
B102097-0-0113Page 14
MAINTENANCE AND CLEANING
WARNING
Never clean a hot grill. Make sure that the grill is cool and
all coals are completely extinguished prior to removing any
parts. A hot grill could cause severe burns.
WARNING
Accumulated grease is a re hazard. Empty ash tray before
each use and clean any grease build-up as needed.
Grids
The grids are best cleaned with a long handled brass or stainless
steel brush (NOT STEEL) during the preheating period.
Inside the Grill
Remove cooking grids charcoal frame, grates and ash pan. Use
a brass brush and or scraper to clean and loosen debris from the
bottom sides and lid. Be careful not to damage gasket material.
Use a wet dry vacuum to pick up loose debris.
If desired you can wash the inside of the grill. Wash the inside
with a mild detergent and warm water and scrub using a brass
brush. Be careful not to damage gasket material. Rinse well and
wipe dry.
Ash Pan
Any grease build-up should be scraped out with a putty knife
or scraper tool, and the debris brushed into a non-combustible
container. Wash with a mild detergent and warm water. Rinse
well and wipe dry.
Grill Exterior
Clean regularly with a solution of mild detergent and warm water.
Touch up paint is available from your dealer. Broilmaster protec-
tive covers are recommended. Stainless steel can be cleaned
with a spray on stainless steel cleaner found in most hardware
stores or home center.
IMPORTANT!
Do not use harsh or abrasive cleaners on the exterior of
your grill or mounting. This could damage the paint or n-
ish on the grill.
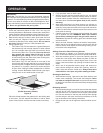
Heat Indicator Calibration
1. The heat indicator can be calibrated if needed. Remove the
heat indicator from the grill and place the probe end in a pot
of boiling water. It should read 212 degrees. Set the heat indi-
cator by turning the nut on the back slightly until it reads 212
degrees, and recheck again.
Gasket
The gasket material installed on the lid and doors is designed to
last for years under normal use. If the gasket shows signs of de-
terioration or excessive wear, it should be replaced using the ap-
propriate Broilmaster Replacement Gasket Kit:
DPP307 Door Gasket Kit
DPP308 Lid Gasket Kit
Gasket Replacement Instructions
WARNING
Make sure that the grill is cool and all coals are completely
extinguished prior to removing any parts or servicing. A hot
grill could cause severe burns.
1. Ensure the grill is cool before starting.
2. Remove the cooking grids.
3. With a at edged scraping tool or putty knife, remove the old
gasket material.
4. Remove any gasket or adhesive residue with household ad-
hesive remover. Always follow the manufacturer’s safety in-
structions when using these products.
5. Allow the grill to dry for 30 minutes.
6. Replace the gasket material by removing the backing tape
from the new gasket. Take care to not touch the adhesive
side. Starting in a rear corner, lay the gasket along the outer
edge and press rmly. Do not pull or stretch the gasket when
applying.
7. Trim any excess gasket material as needed.
8. Close the lid and/or doors and let dry for 24 hours.
IMPORTANT! Initial Use: The rst time the grill is used with the
new gasket, operate the grill at temperatures of 350 to 400 de-
grees maximum. This will season and set the gasket adhesive
properly. Let burn for at least 60 minutes.