


Special offers from our partners!

Find Replacement BBQ Parts for 20,308 Models. Repair your BBQ today.

Before you start - please read the
instructions carefully - planning your
installation will save you time and effort.
Look at the different ways the appliance
can be installed - as shown on the
following pages - and plan the installation
to suit your
situation.
Leave the appliance in the base tray
packaging until you are ready to install it.
When you remove the appliance from the
base tray packaging, take care not to
damage it.
Whilst every care is taken to eliminate
burrs and raw edges from this product,
please take care when handling - we
recommend the use of protective gloves
during installation.
Please note that the weight of this appliance
isapproximately 47kg(unpacked). Takecare
when lifting it into the housing unit - always
use an appropriate method of lifting.
This appliance must be installed only at
low level - ie; under a worktop. The
controls have been designed for viewing at
a low level, and it should therefore not be
installed at high level.
Please note that all dimensions and sizes
given are nominal, some variation is to be
expected.
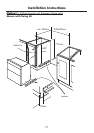
If this appliance is to be installed near to a
corner where the adjacent cabinets run at
right angles forward of the appliance,
there must be a gap of at least 90mm
between the appliance and the cabinets,
to prevent overheating of the cabinets.
Important: Do not modify the outer
panels of this appliance in any way.
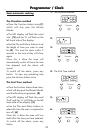
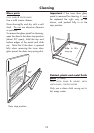
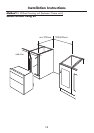
Fixing screws - The fixing screws are in
a polythene bag in the oven pack.
Depending on the method of installation,
some of the screws may not be needed.
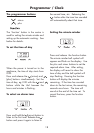
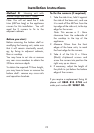
Step 1: Prepare for installation
There are 3 methods of installing
the appliance:
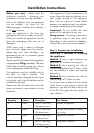
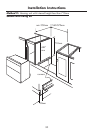
Method 1:
Into a space between two
base units, ie; without a housing unit.
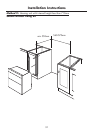
Method 2:
Into a housing unit, with an
internal height of less than 710mm, which
can be modified to obtain the required
dimensions.
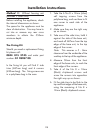
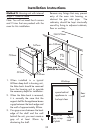
Method 3:
Into a housing unit, with an
internal height of 710mm or more.
If you have a non standard size of cabinet
which leaves a gap above or below the
appliance, you may be able to buy a trim
kit (to fill in the gap) from the supplier of
your cabinets.
25
Quantity Colour Description For Fixing:
6 Silver No 8 x 12mm long Runners to appliance
Self tapping screw
12 Black No 8 x 12mm long Runners and sidetrims to cabinet
Chipboard screw or housing
6 Black No 8 x 25mm long Appliance to cabinet
Chipboard screw
2 Silver No 8 x 12mm long Appliance to sidetrims
Self tapping screw
Installation Instructions