


Special offers from our partners!

Find Replacement BBQ Parts for 20,308 Models. Repair your BBQ today.

7
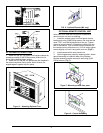
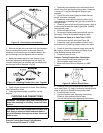
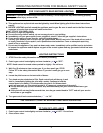
Figure 14 - Accessing burner assembly
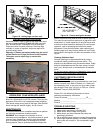
Figure 15 - Attaching Flexible Gas Lines Together
WARNING: Test all gas piping and connections for
leaks after installing or servicing. Correct all leaks
at once.
WARNING: Never use an open flame to check for a
leak. Apply a mixture of liquid soap and water to
all joints. Bubbles forming show a leak. Correct all
leaks at once.
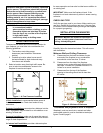
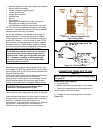
Figure 16 - Manual Shutoff Valve
Figure 17 - Checking Gas Joints
3. Remove the gas line cover plate from the fireplace’s
outer surround at the location to be used. Remove
insulation from inside the gas line conduit sleeve. Run
gas line through until the regulator can be reached.
4. Apply pipe sealant lightly to male threads of gas
connector attached to flexible gas line (see figure 15).
Connect flexible gas line to flexible gas line attached to
gas inlet gas valve of fireplace. (Fig 14).
5. Check all gas connections for leaks. See Checking
Gas Connections, below.
6. Place log base assembly completely into the
fireplace.
CHECKING GAS CONNECTIONS
Pressure Testing Gas Supply Piping System
Test Pressures in Excess of ½ PSIG
1. Disconnect the fireplace and its individual manual
shutoff valve from gas supply piping system. Pressures
in excess of ½ psig will damage the fireplace gas
regulator.
2. Cap off the open end of gas pipe where manual
shutoff valve was connected.
3. Pressurize supply piping system by either using
compressed air or opening main gas valve located on or
near gas meter.
4. Check all joints of gas supply piping system. Apply a
mixture of liquid soap and water to gas joints. Bubbles
forming show a leak.
5. Correct all leaks at once.
6. Re-connect fireplace and manual shutoff valve to
gas supply. Check re-connected fittings for leaks.
Test Pressures Equal to or Less Than ½ PSIG
1. Close manual shutoff valve (see Figure 16)
2. Pressurize supply piping system by either using
compressed air or opening propane supply tank valve.
3. Check all joints from propane supply tank (see fig
24). Apply a mixture of liquid soap and water to gas
joints. Bubbles forming show a leak.
4. Correct all leaks at once.
Pressure Testing Fireplace Gas Connections
1. Open manual shutoff valve (see figure 16).
2. Open propane supply tank valve.
3. Make sure control knob of fireplace is in OFF
position.
4. Check all joints from manual shutoff valve to gas
valve (see Figure 17). Apply a mixture of liquid soap and
water to gas joints. Bubbles forming show a leak.
5. Correct all leaks at once.
6. Light the fireplace (see Operating Instructions).
Check all other internal joints for leaks.
7. Turn off the fireplace (see Operating Instructions).