


Special offers from our partners!

Find Replacement BBQ Parts for 20,308 Models. Repair your BBQ today.

5
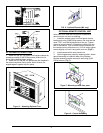
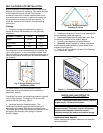
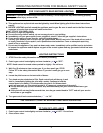
Fig. 9 - Rough Opening for Floor
Installation in Wall
Figure 10 - Rough opening for
Installing in Corner
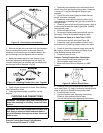
Figure 11 - Framing/Cabinet Mounting Holes
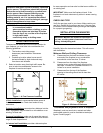
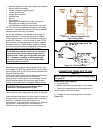
NOTICE: A qualified person must connect fireplace
to gas supply. Follow all local codes.
CAUTION: Never connect heater directly to the
propane supply. This heater requires an external
regulator(not supplied). Install the external
regulator between the heater and propane supply.
BUILT-IN FIREPLACE INSTALLATION
Built-in installation of this fireplace involves installing a
fireplace into a framed-in enclosure. This makes the front
of the fireplace flush with the wall. Best outdoor
enclosure construction includes metal stud with tile or
concrete board as an overlay. Additions of ceramic tile
and acrylic stucco finishes provide good service. To
install the fireplace in this manner, use the following
instructions:
Framing
1. Construct framing using dimensions, shown in
figures 13 through 15, depending on your particular
installation.
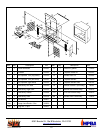
UV36OFP Fireplace Actual Framing
Height 32
3/8" 33"
Front Width 36" 36
½"
Depth 18
½" 19"
If the fireplace is to be installed directly on carpeting, tile
(other than ceramic), or any combustible material other
than wood flooring; the fireplace must be installed upon a
metal or wood panel extending the full width and depth of
the fireplace.
If a raised platform is to be constructed, ceiling
clearances must be maintained (refer to section on
clearances, page 4).
If installing in a corner, use dimensions shown in figure 9
for the rough opening. The height is 33" which is the
same as the wall openings, page 5.
2. Install gas piping to fireplace location. This
installation includes an approved flexible gas line (if
allowed by local codes) after the manual shutoff valve.
The flexible gas line must be the last item installed on the
gas piping. See Installing Gas piping to Fireplace
Location, page 6.
3. Carefully set fireplace in front of rough opening with
back of fireplace inside wall opening.
4. Attach flexible gas line to fireplace gas valve. See
Connecting Fireplace to Gas Supply, page 6.
5. Carefully insert fireplace into rough opening.
6. (Optional) Attach fireplace to framing using wood
screws through holes located on interior sides of the
fireplace (See Figure 11).
7. Check all gas connections for leaks. See Checking
Gas Connections, page 6.
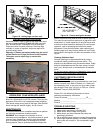
INSTALLING GAS PIPING TO
FIREPLACE LOCATION
Installation Items Needed
Before installing the fireplace, make sure you have the
items listed below.