


Special offers from our partners!

Find Replacement BBQ Parts for 20,308 Models. Repair your BBQ today.

18
JNR & WNK Assembly Instructions
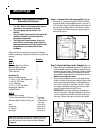
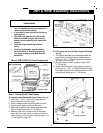
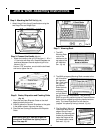
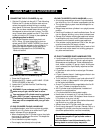
Step 4: Attaching the Grill Lid
(Fig. 30)
1. Attach the grill lid to the grill head bottom using the
two Hinge Pins and Hinge Clips.
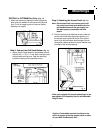
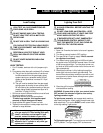
Step 5: Connect the Handle
(Fig. 31)
1. Attach the handle to the grill lid using two ¼ - 20 x 1
½" Hex bolts with Kep nuts. Graphite Gaskets are
positioned between the end caps and grill lid as
shown in fig. 31.
Use two 7/16" wrenches, one to hold the bolt head
and one to tighten the nut.
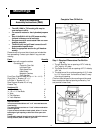
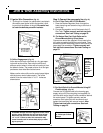
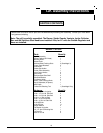
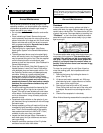
Step 6: Grates, Briquettes and Cooking Grids
(Fig. 32)
1. Place the one piece Briquette Grate on the shelf
edge just above the burner.
2. Carefully place the Ceramic Briquettes on the grate
in the pattern shown. Use only one layer.
3. Place the two Cooking Grids above the Briquette
Grate.
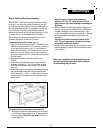
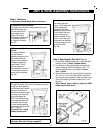
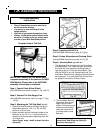
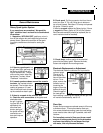
Step 7: Warming Rack
1. The JNR
Warming Rack
rests in the
notches on the
top edge of the
grill head bot-
tom.
(Fig. 33)
2. The WNK swingawayWarming Rack connects to the
grill lid and the
grill head bot-
tom. First, insert
the right Top
and Bottom
Rods into their
respective
mounting holes
on right side of
the grill lid and grill head bottom. Then slide the
RACK to your left, positioning the left Top and Bottom
Rods into their respective mounting holes simultane-
ously. The Lower Right Rod End can then be
“popped” into place by flexing it inward.
(Fig. 34)
Before using your grill, leak test all gas line
connections. And follow the lighting instruc-
tions. See page 23.
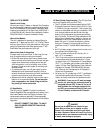
3. The SearMagic Warming
Rack drops onto the top
edge of the grill head
bottom. the warming rack
bracket is positioned be-
tween the hinges of the
grill head bottom inside
back wall.
(Fig. 35)